Please visit our new and updated site by clicking here.
Learn the technique .....
Page 1
Principles:
- Vaginal walls are incised by monopolar current (30-35 watts).
- Lateral attachments and adhesions are desiccated by bipolar current (45 watts) close to uterus and divided by scissors. Clamps are not used. Uterine arteries are secured extraperitoneally by newly designed Purohit approach to uterine artery.
- Right angle forceps is used throughout to elevate, hook, spread, and retract all the lateral attachments and
vessels from their posterior aspects; tissues were desiccated and divided between the prongs of forceps (Figure I).
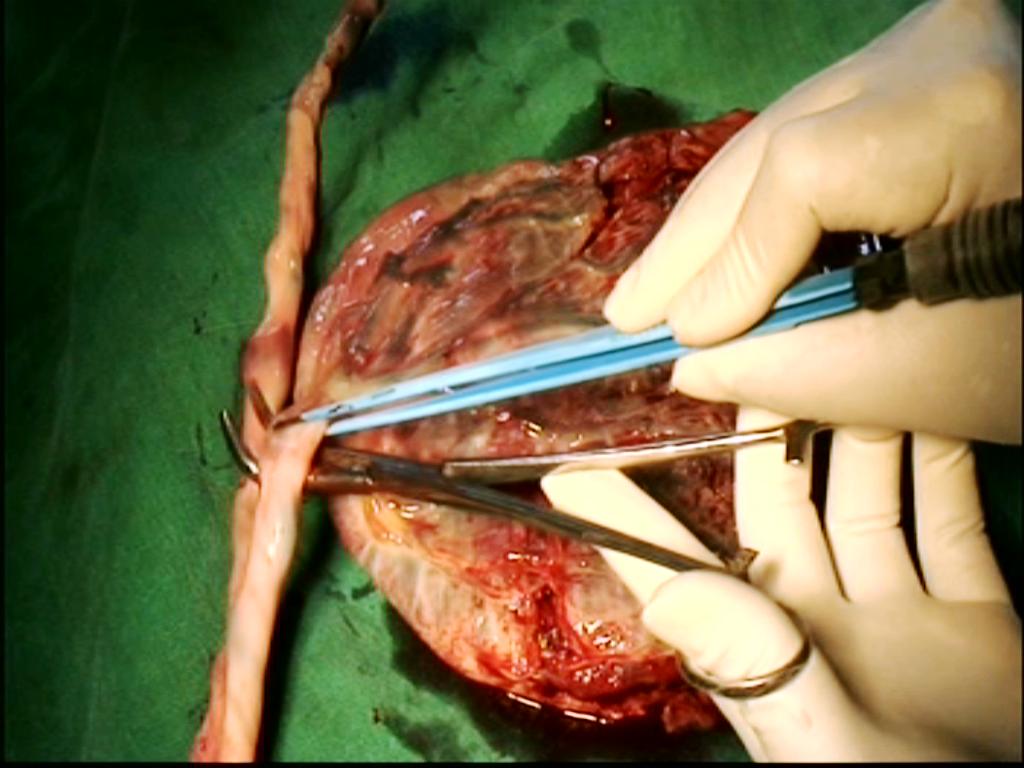
Figure - I Placenta model
- Conventional volume reduction maneuvers used to reduce the volume of a large uterus to create the parauterine space to approach the lateral attachments.
- Suture is only used to attach Mackenrodt’s ligament to vaginal vault and in vault closer.
- 10 mm telescope with light sources or a pelvic illuminator is used as a rigid torch if needed to illuminate the deeper and darker part of pelvis and during vaginal salpingo-oophorectomy.
Instruments and equipments:
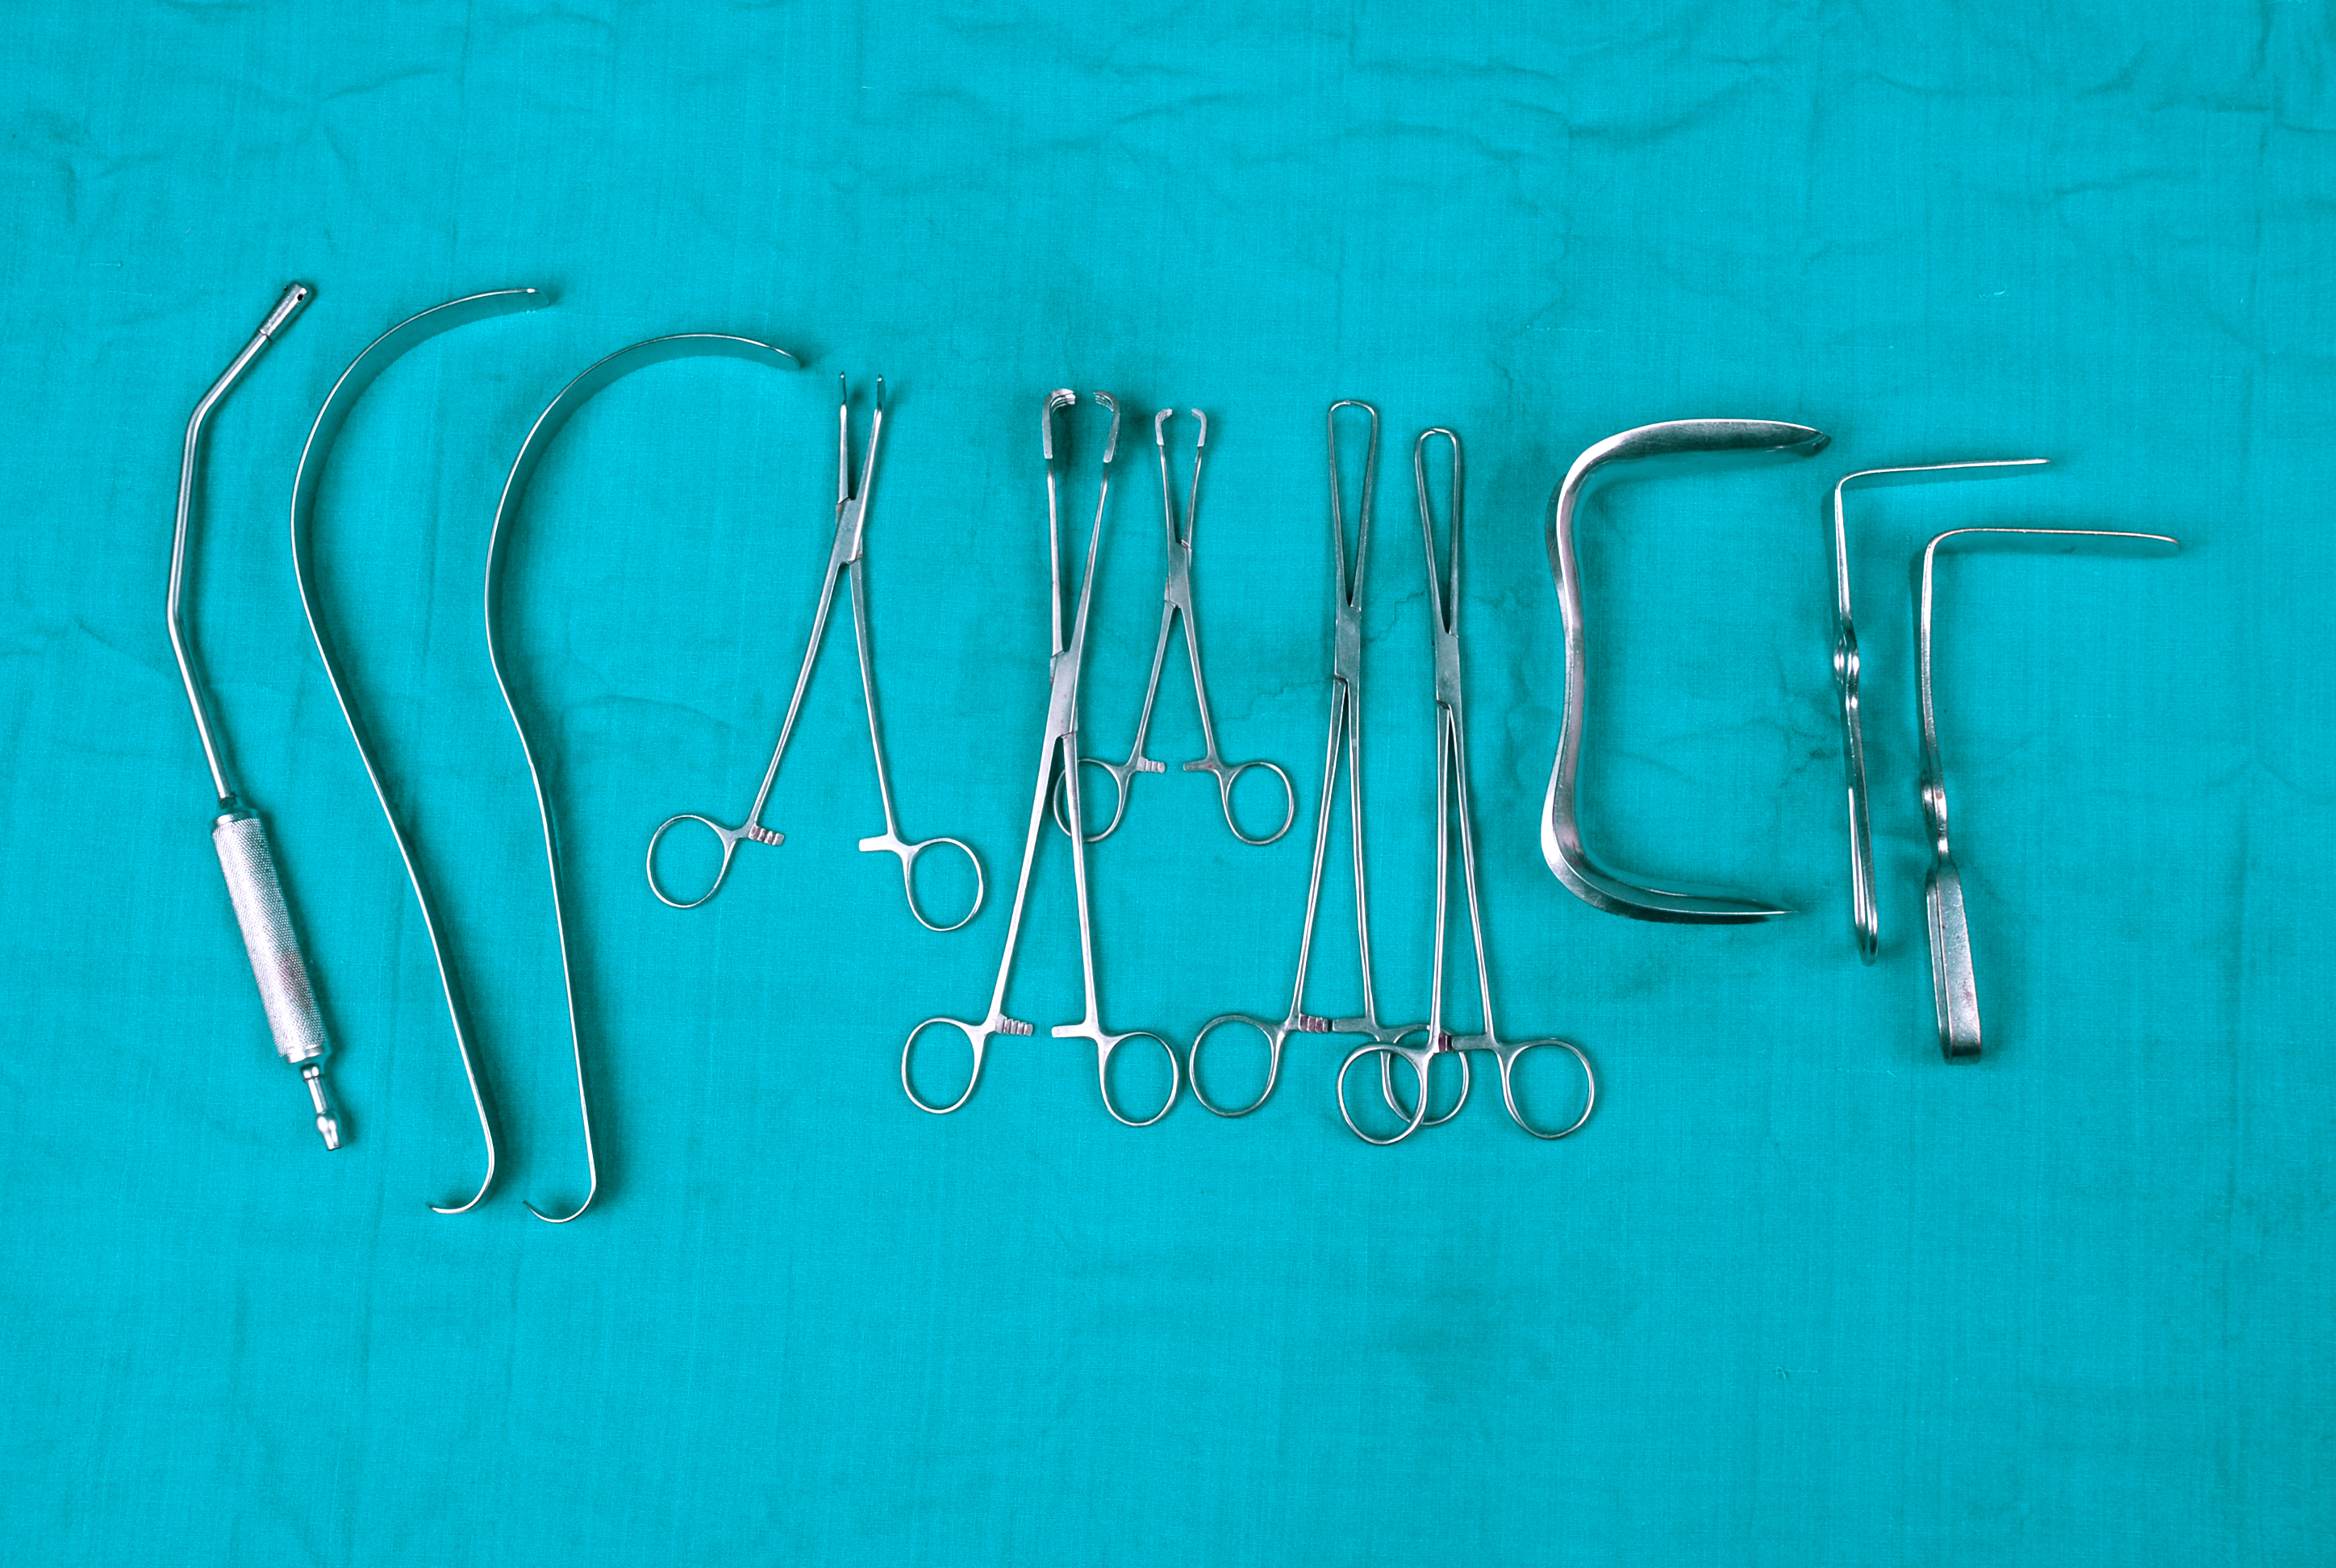
Figure - II instruments for vaginal hysterectomy
- Sim’s speculum big size (No 1) -1
- Alli’s forceps (22 cm)-6
- Long curve suction cannula (34 cm)-1 with suction machine: Long curve suction cannula is occasionally helpful for retraction of omentum and guts after hysterectomy to expose the stumps on lateral pelvic wall.
- Right angled retractors (blade length 3- 4 inches)-2
- 20ml disposible syringe-1
- Inj.Adrenaline (1:1000) - 1 amp
- Normal saline two bottle, one I V set-needed for lavage during the operation procedure and after hysterectomy.
- Lahey’s or Mixter’s forceps (8- 9 inches)-1-is used as anatomy delineator. We prefer Lahey’s forceps. presently, we have modified the Lahey’s forceps and named it 'PTVH' forceps
- Long artery forceps (22 cm)-2
- Electrocautery-with mono and Bi polar electrode facility-1(monopolar setting at 30-35 watts and bi polar setting at 45-50 watts)
- Monopolar electrode with cable-1
- Bipolar forceps (22 cm) with cable-1
- Long Mayo scissors (7-9 inches)-1
- Deaver's retractor (1 inch width) -2-needed when the space is less like in cases with previous cesarean section and salpingo oophorectomy associated with short infundibulopelvic ligament.
- Vicryl no 1-1
- Needle holder-1
- Ryle's tube no 18 or 20 G-1-inserted on the right side of pelvis just before closer of the vaginal vault. It is used for lavage of pelvis after hysterectomy with 540 ml of normal saline.
- Fibreoptic cord with Light source-1
- R K Purohit pelvic illuminator or 10 mm Telescope to transmit light. 1-used when poor visibility obstructs the progress. Pelvic illuminator contains only fiber optic cords it has no lens. Thus, it is cheaper to buy.
For volume reduction or debulking of large uterus.
- Blade on handle-1-slowly incise and control the movement of the knife during incision.
- Single tooth tenaculums (26 cm)-2- long one is better for the work in deeper place.
- Cat paw forceps (22 cm)-2 -long one is better for the work in deeper place.
- Single bladed Sim’s speculum (blade length 12 cm)-1 -long blade is better to retract the rectum and to expose the lateral pelvic wall stumps.
- Optional Bi clamp with cable.
- Additional Harmonic (focus or wave) with its generator or any other energy source,if desired.
Instrument suppliers:
- For Pelvice Illuminator (Dr. R.K. Purohit),cables and other surgical instruments
Kalelker Surgicals Pvt. Ltd,
7&8, Rosary Building, M.M. Chotani Road,
Mahim (W) , Mumbai- 400016
Tele/Fax: 022-24441042 / 24457030 / 24472112 / 24442644 / 24459714 / 24472113 Contact :Balasaheb Sawan
Email: Chirkal@Bom7.Vsnl.Net.In / Kalelkersurgicals@Yahoo.Co.In
Website: Www.Kalelkersurgicals.Com - For PTVH forceps and other surgical instruments :
Creative Surgicals Mfg. Co.
Registered Office:
4/4, Nisargadatta Co-Op Hsg.Co.
Bandra Reclamation (W) Mumbai-50.
Res- 022- 26433124, Mob- 98202245388
Contact: Sandeep Kulkarni
Sales Office
R. No. 82-A, 4th Floor, 187 Mulji Jetha Bldg,
Princess Street, Marine Lines, Mumbai-2.
Telefax- 022- 66352774
Email: Sandeepcreative@Rediffmail.Com
Sandeepcreative@Hotmail.Com
- Bipolar forceps plus cables and Bi clamp plus cable,Electrocautery :
Xcellance Medical Technologies Pvt. Ltd,
3075, Bhandup Indl. Estate,
Pannalal Compound, Lbs Marg,
Bhandup (West), Mumbai- 400078 ,
India
contact Pradeep Narkhede
Tele: 022-25964645, 32995113
EMAIL: info@xcellancetech.com
WEBSITE : www.xcellancetech.com. - Bipolar forceps plus cables and Bi clamp plus cable, Electrocautery :
1.Biomed Electronics,
35/1477a, South Janatha Road, Palarivattom,
P.o. Cochin . 682025 . Kochi - Tel. 484 2341 335. Fax 484 2349 695:
Mr. R. Ravindranath (Managing Director).
2.ARP medical system,
Chennai,600062,
Tel 044 26376751,9444011218,9840111218
contact :A Ravichandran
Steps in the standard procedure:
Give a good lithotomy position. This position facilitates accessibility of the cervix. Start vaginal hysterectomy in the standard manner. Connect the monopolar and bipolar cables to the generator. Switch on the generator. See the current setting of the generator. Set monopolar at 30-35 watts and the bipolar at 45-50 watts. Use well insulated and good quality of bipolar forceps. Broken insulation on the body of bipolar forceps may cause heat injury to the vulval skin of the patient. Insert the Sims’s speculum. Hold each lip of cervix by Alli’s forceps. Give traction on the cervix. Retract the vaginal walls by right-angled retractors: one anteriorly and one laterally. Mix 3 drops of injection adrenaline (1 in 1000) strength in 30 ml of normal saline. Fill the solution in a 20 ml disposable syringe. Then infiltrate the fluid around the cervix to cause sub- mucosal oedema. Patient may have tachycardia. Use plane normal saline in cases adrenaline is contraindicated. Make a semi lunar incision by pure cutting current at the cervico-vaginal junction of the anterior vaginal wall. Assistant holds the anterior margin by Allis forceps and gives traction to expose supravaginal septum. Incise the lower part of supravaginal septum directing scissors against the cervix. Then find the cleavage and separate the bladder from the cervix by index finger. Do not incise anterior cul-de-sac peritoneum at this stage and keep it intact. Now, pull the cervix anteriorly to stretch the posterior vaginal wall. Grasp the loose posterior fornix by Alli’s forceps and stretched it. Incise the posterior vaginal wall by cutting current at the cervico-vaginal junction. Strokes of monopolar needle should be gentle to cut only the vaginal wall avoiding the peritoneum. Hold the posterior margin of the incision by Allis forceps on left hand and separate the posterior cul-de-sac peritoneum from the vaginal wall by the index finger of right hand. Do not open pouch of Douglas at this stage. Move the speculum further into the dissected space to stretch the posterior vaginal wall. Now, remove the Alli’s forceps holding posterior incised margin behind the speculum. Insert retractor in to the vesicocervical space and stretch the anterior vaginal wall. Pull the cervix to right side of patient to stretch the cervicovaginal junction of left side. Retract the left lateral vaginal wall by another retractor. Incise the left side vaginal wall by cutting current at the cervicovaginal junction and join the anterior with the posterior semi lunar incision to expose the attachment site of lower ligaments extraperitoneally. Vaginal skin is not peeled up from the surface of ligaments. Suction cannula is used to aspirate the blood during operation. Bring a right angle forceps (Laheys/Mixter) (Figure 1,2)
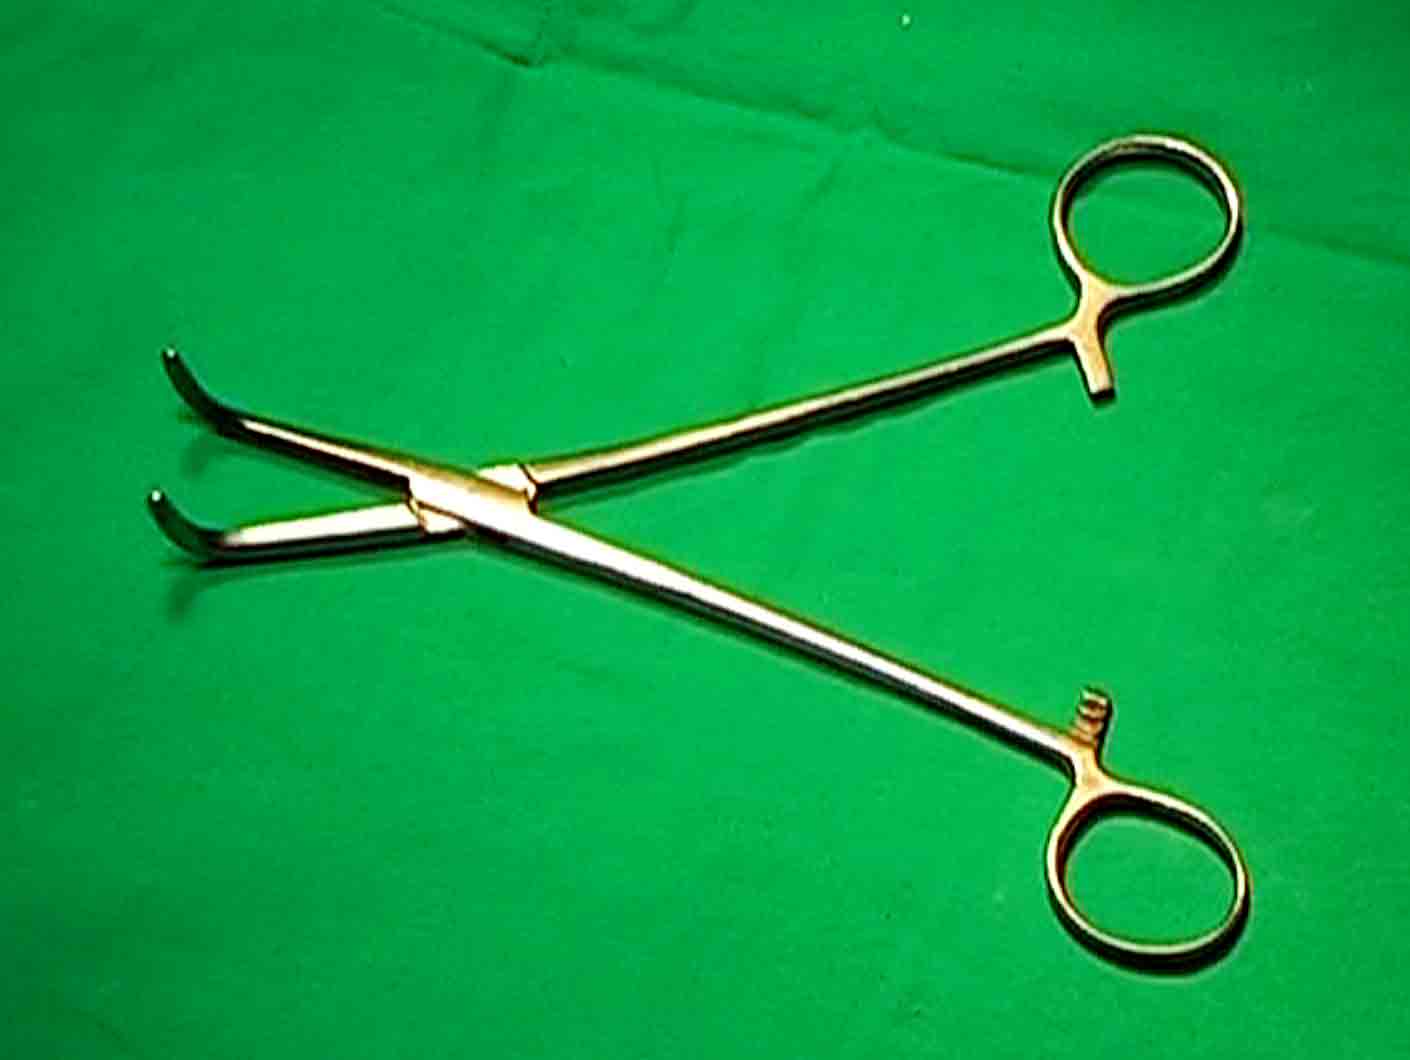
Figure - 1
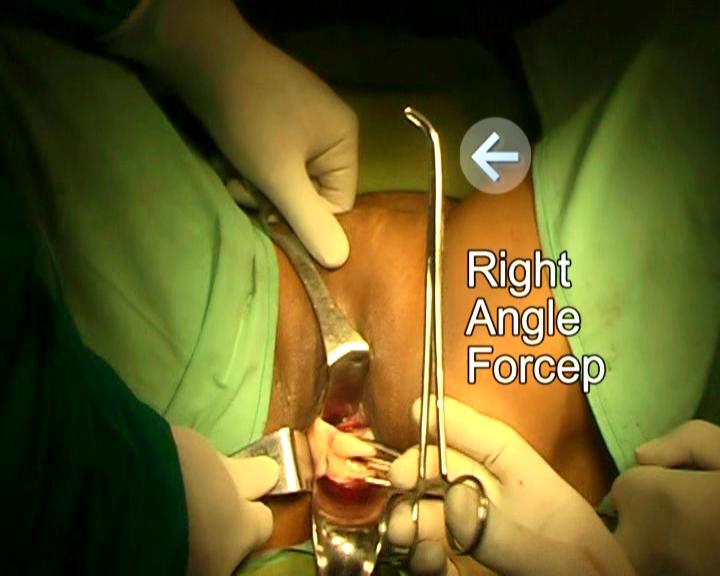
Figure - 2
Direct its tip anteriorly(Figure3).
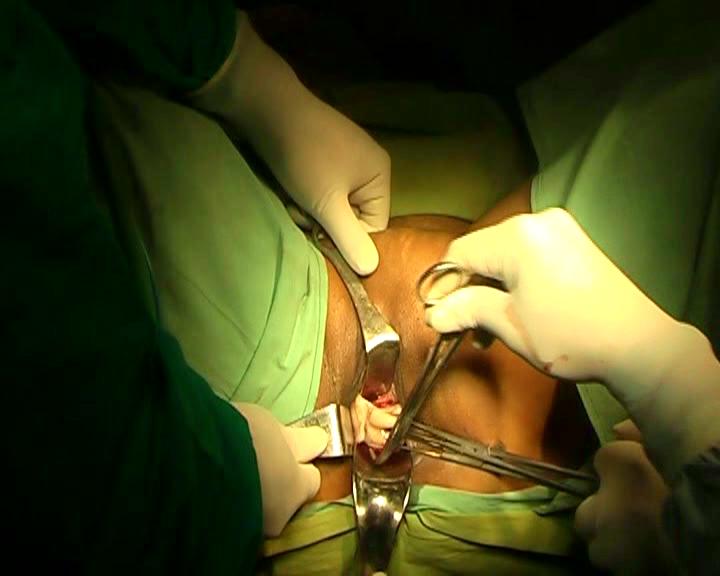
Figure - 3
Apply its tip into the notch between the posterior wall of cervix and lower ligaments extraperitoneally from the posterior aspect (figure 4)
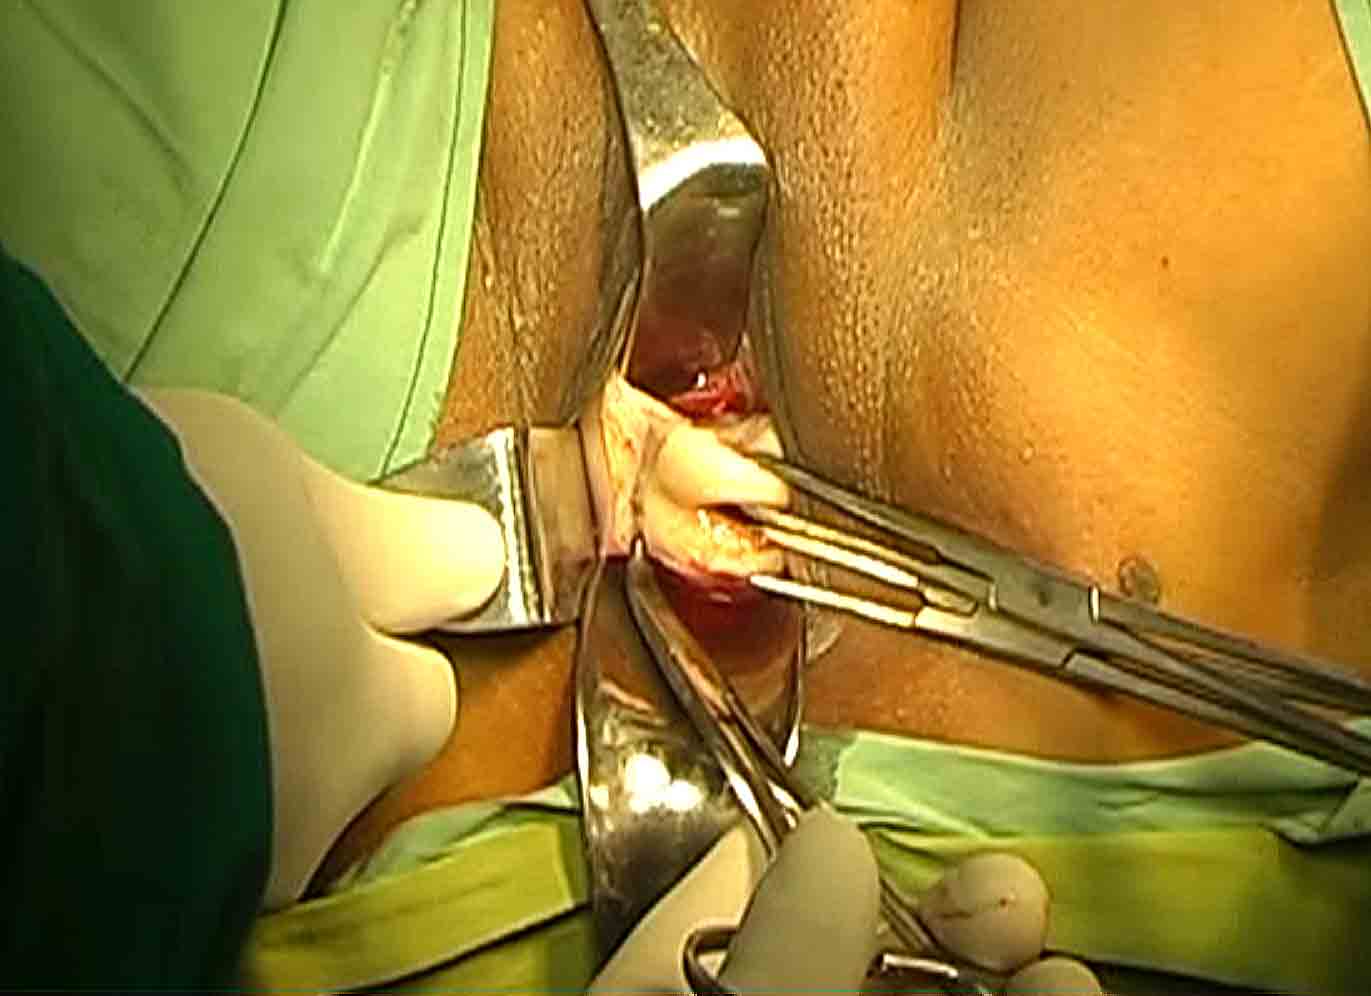
Figure - 4
Spread the prongs. Hold it by left hand and press gently on speculum. It will elevate the cervix and the ligaments from the posterior aspect by a lever action and brings them to surgeon’s view. It stabilizes and brings the ligaments easily to the surgeon’s view and to the mouth of bipolar forceps and scissors. This maneuver increases the accessibility and visibility of lower ligaments in cases with very poor access irrespective of nature of benign pathology. It makes the lateral vaginal wall incision prominent even in cases with poor access. Use a straight bipolar forceps with fine tip (1-2 mm tip width). Length of the forceps preferable should be between 7-9 inches. Remove its insulation of about 1 cm from the tip to increase active surface area or get such one from the manufacturer. Use bipolar current of 45-50 watts. Insert the tip of bipolar forceps into the lateral incision directing the tip of forceps towards cervix and activate. Take smaller bite at a time and go step by step. The attachment site of vesicocervical- cardinal ligaments with the cervix is desiccated. Separate the ligaments from cervix by scissors(Figure5).
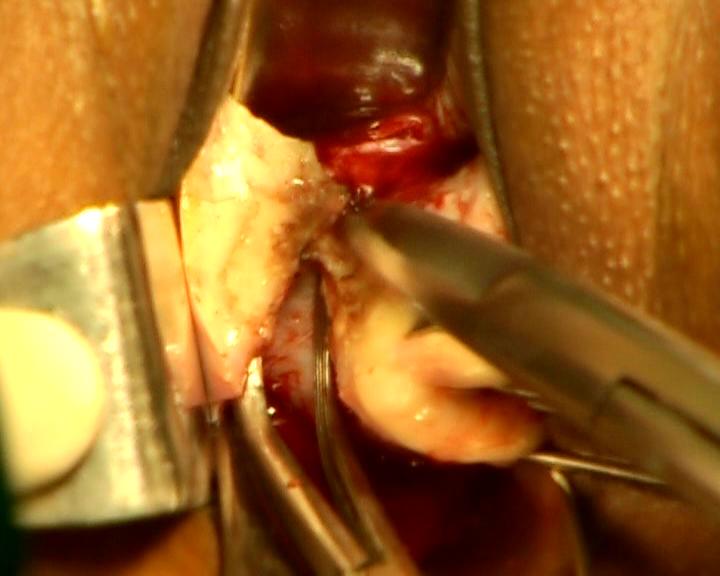
Figure - 5
Only coagulated tissues are divided in every step of operation to avoid bleeding. The procedure is usually started from the vesicocervical ligament and carried out backwards and upwards to detach whole ligaments from the cervix. By a series of elevation by right angle forceps, coagulation, and cut maneuvers, the whole thickness of ligament is separated from cervix. Each maneuver requires two steps (coagulation- and -cut), fewer instrument changes and less space for a thin bipolar forceps than techniques using ligatures for hemostasis that requires three steps (clamping, cutting, and suture ligation), many instrument changes and a wide space for the movement of a curve needle on a holder. It is helpful in gaining access to paracervical attachments under direct vision. Smaller bleeding arterioles if any is coagulated. No clamp is used. No suture is used to ligate the ligament. Ligament stumps remain free and segregated during operation. The right angle forceps creates a narrow working platform between its opened prongs (>4 mm) sufficient for application of bipolar forceps and scissors. The opened prongs keep the neighboring tissues away. Its lateral prong prevents the lateral wall structures coming into working space between prongs. Its bend tip hooks structures and prevents slipping unlike an artery forceps. It is not used as a clamp in this procedure.
(Recent modifications Incise the anterior vaginal wall (do not dissect vaginocervical space). Then incise posterior vaginal wall. Now, dissect posterior peritoneum from the vaginal wall and insert speculum in to the dissect space. Similar to the above method, stretch the cervix and retract the vaginal walls. Apply right angle forceps from the posterior aspect as above between cervix and cardinal ligament. Take the bipolar forceps. Through right lateral vaginal incision, cauterize the lower portion of the cardinal ligament and incise the cauterized area to create a split of about one cm. Through the split, insert the closed tip of right angle forceps anteromedially between the cervix and the vaginal wall. It enters through the cleavage between cervix and vaginal wall, and hooks the suprovaginal septum. Now, open the prongs of forceps and stretch the septum between the prongs (Figure 6). Cauterize the septum close to the cervix and divide by scissors. Retractor enters the cervicovaginal space to retract the anterior vaginal wall. Again, apply the tip of right angle forceps from the posterior aspect of cardinal ligament. Spread the ligament between prongs of forceps. Cauterize the ligaments close to cervix and incise to separate cardinal ligament from cervix. Two to three similar applications completely separates the vesicocervical-cardinal ligament from the cervix. Fascia in the vesicouterine space is dissected by procedure similar to dissection of that of supravaginal septum. Retraction of the cardinal ligament stump visualizes the uterine artery bulge on the lateral wall of uterus. The dissected uterosacral ligament is not separated from cervix at this stage and before opening the posterior pouch.) Advantages-problem of finding cervicovaginal cleavage has been eliminated by the modifications. A clear uterosacral ligament separated from cardinal ligament is achieved. It is finally, fixed to lateral vaginal wall to support vaginal vault at the end of hysterectomy.
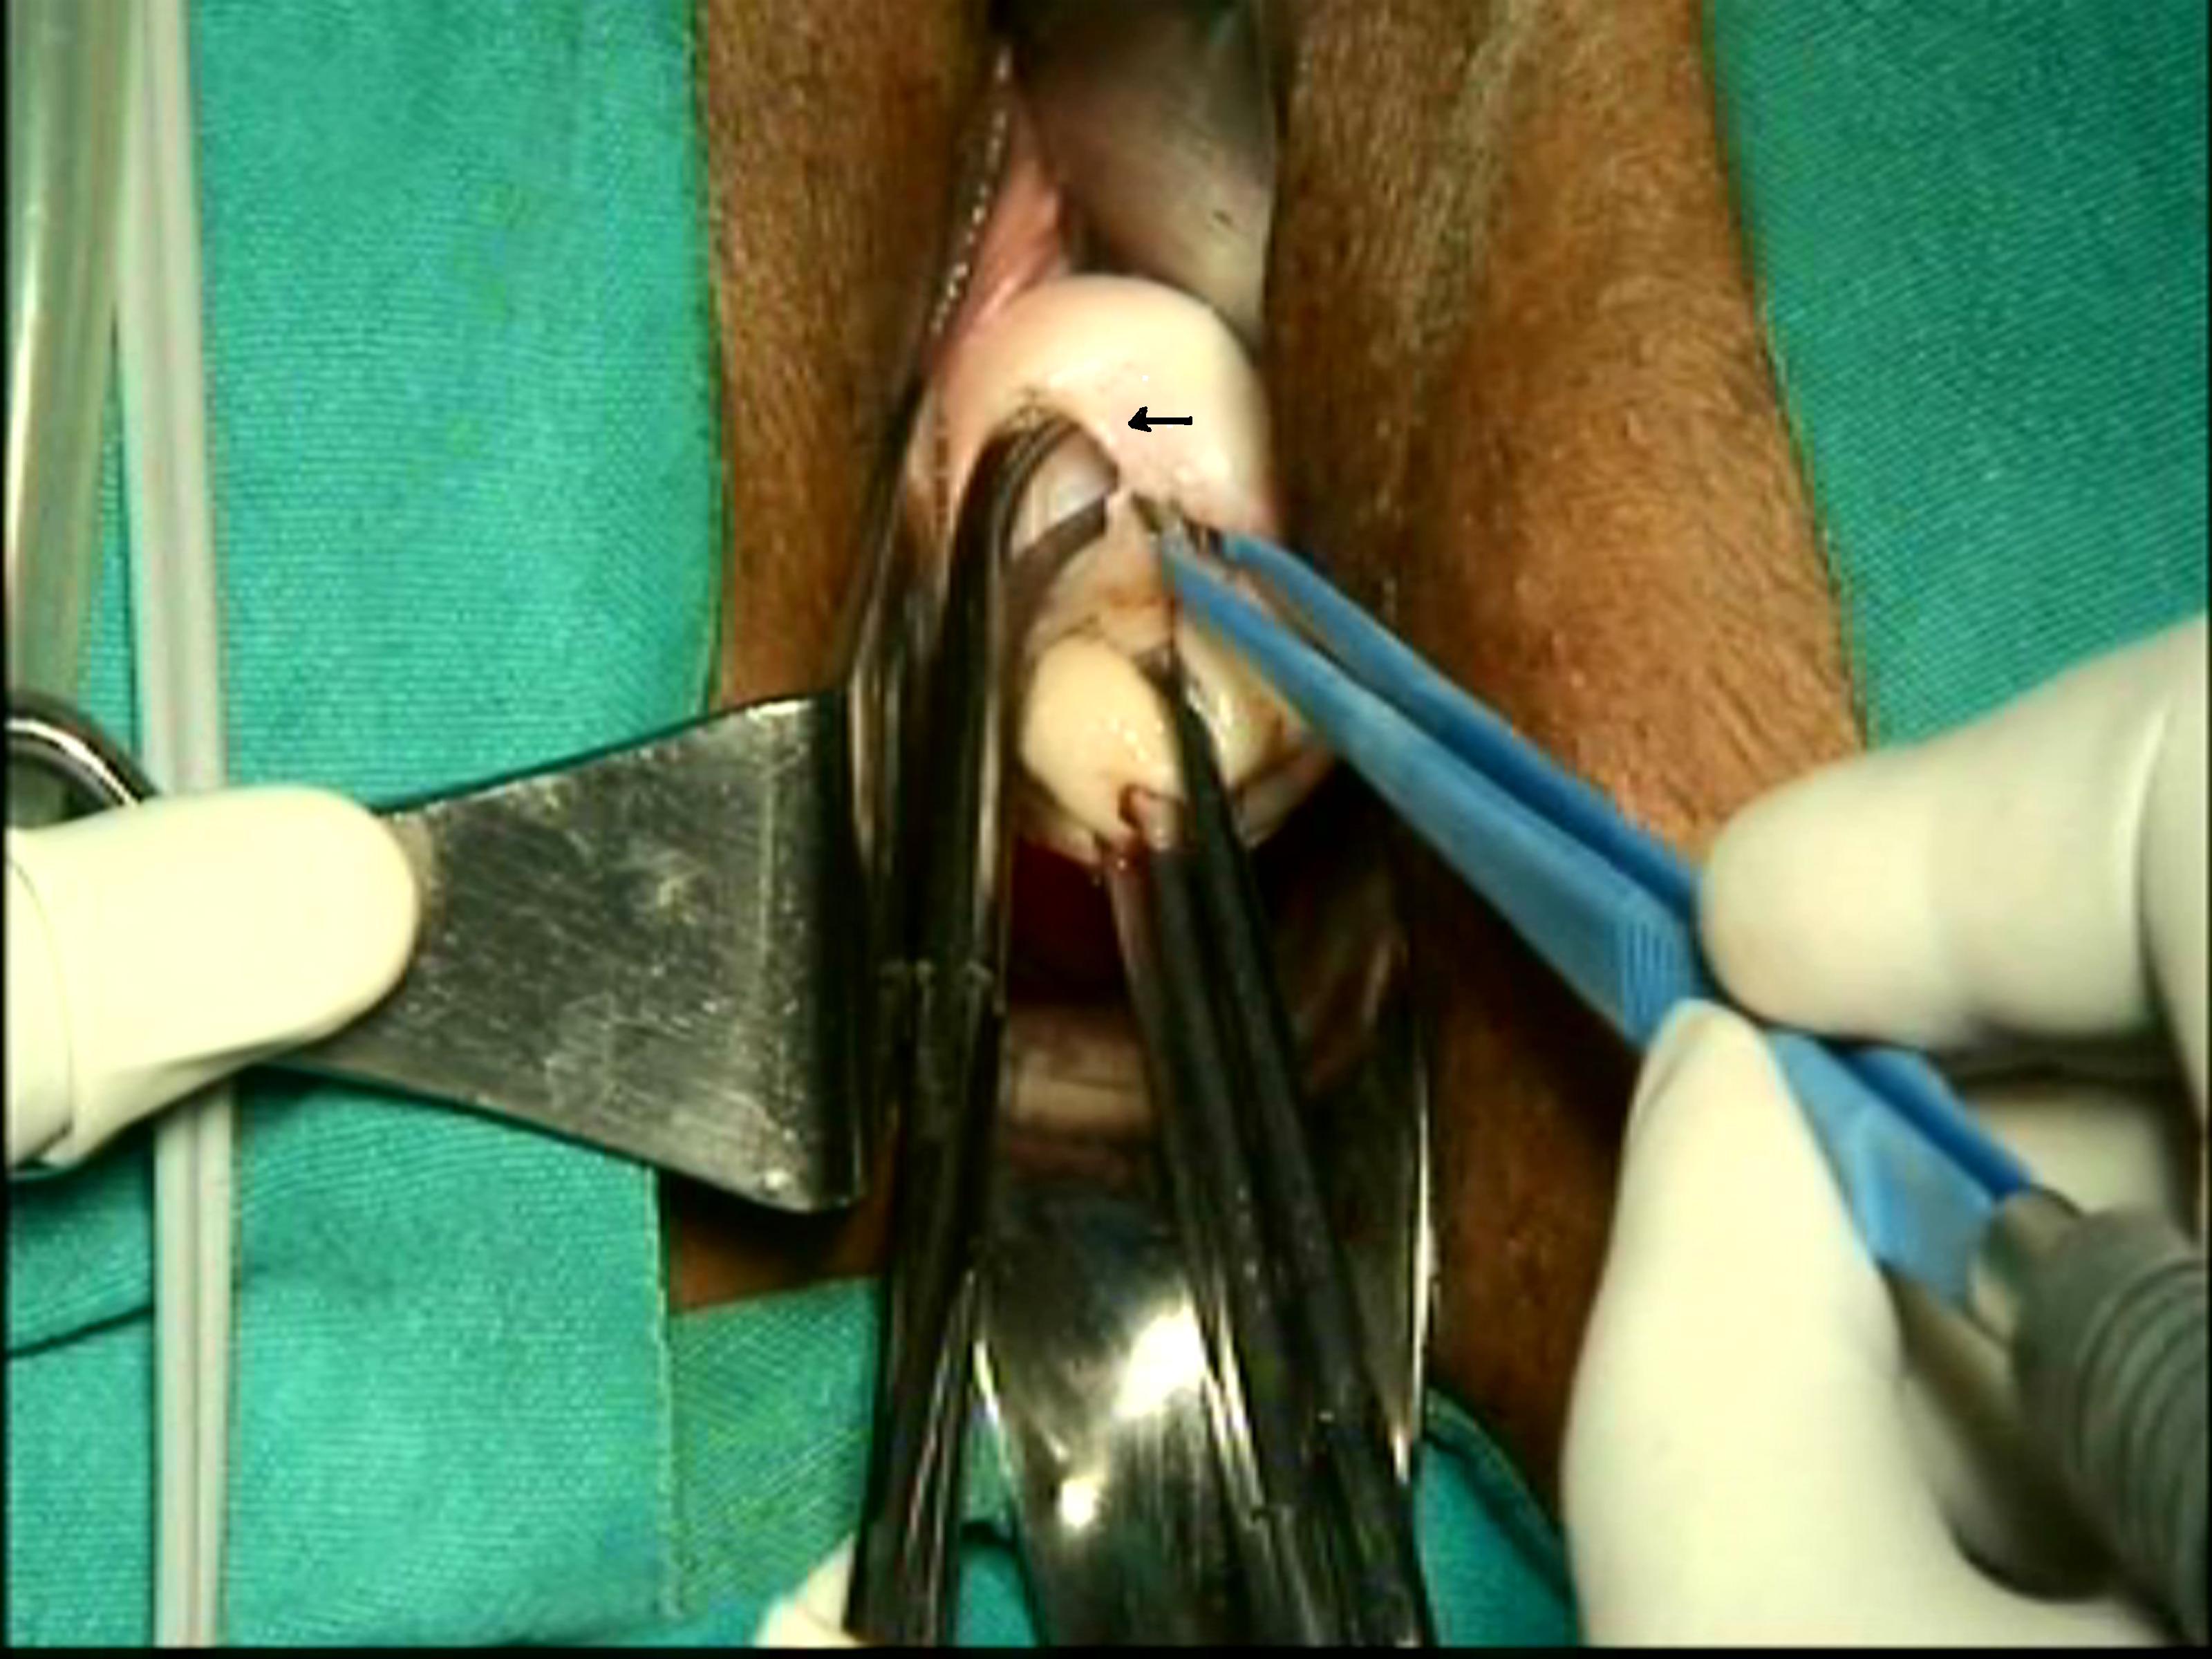
FIgure - 6
Push the divided ends of ligaments by index finger directing finger against the lateral uterine wall and in the direction of ascending branch of uterine artery. These maneuvers and the traction between the speculum posteriorly, retractors anteriorly and laterally cause a wide separation of the anterior and posterior leaves of lower broad ligament and create a wide parauterine working space extraperitoneally. It will expose the bulge of uterine artery(Figure 7).
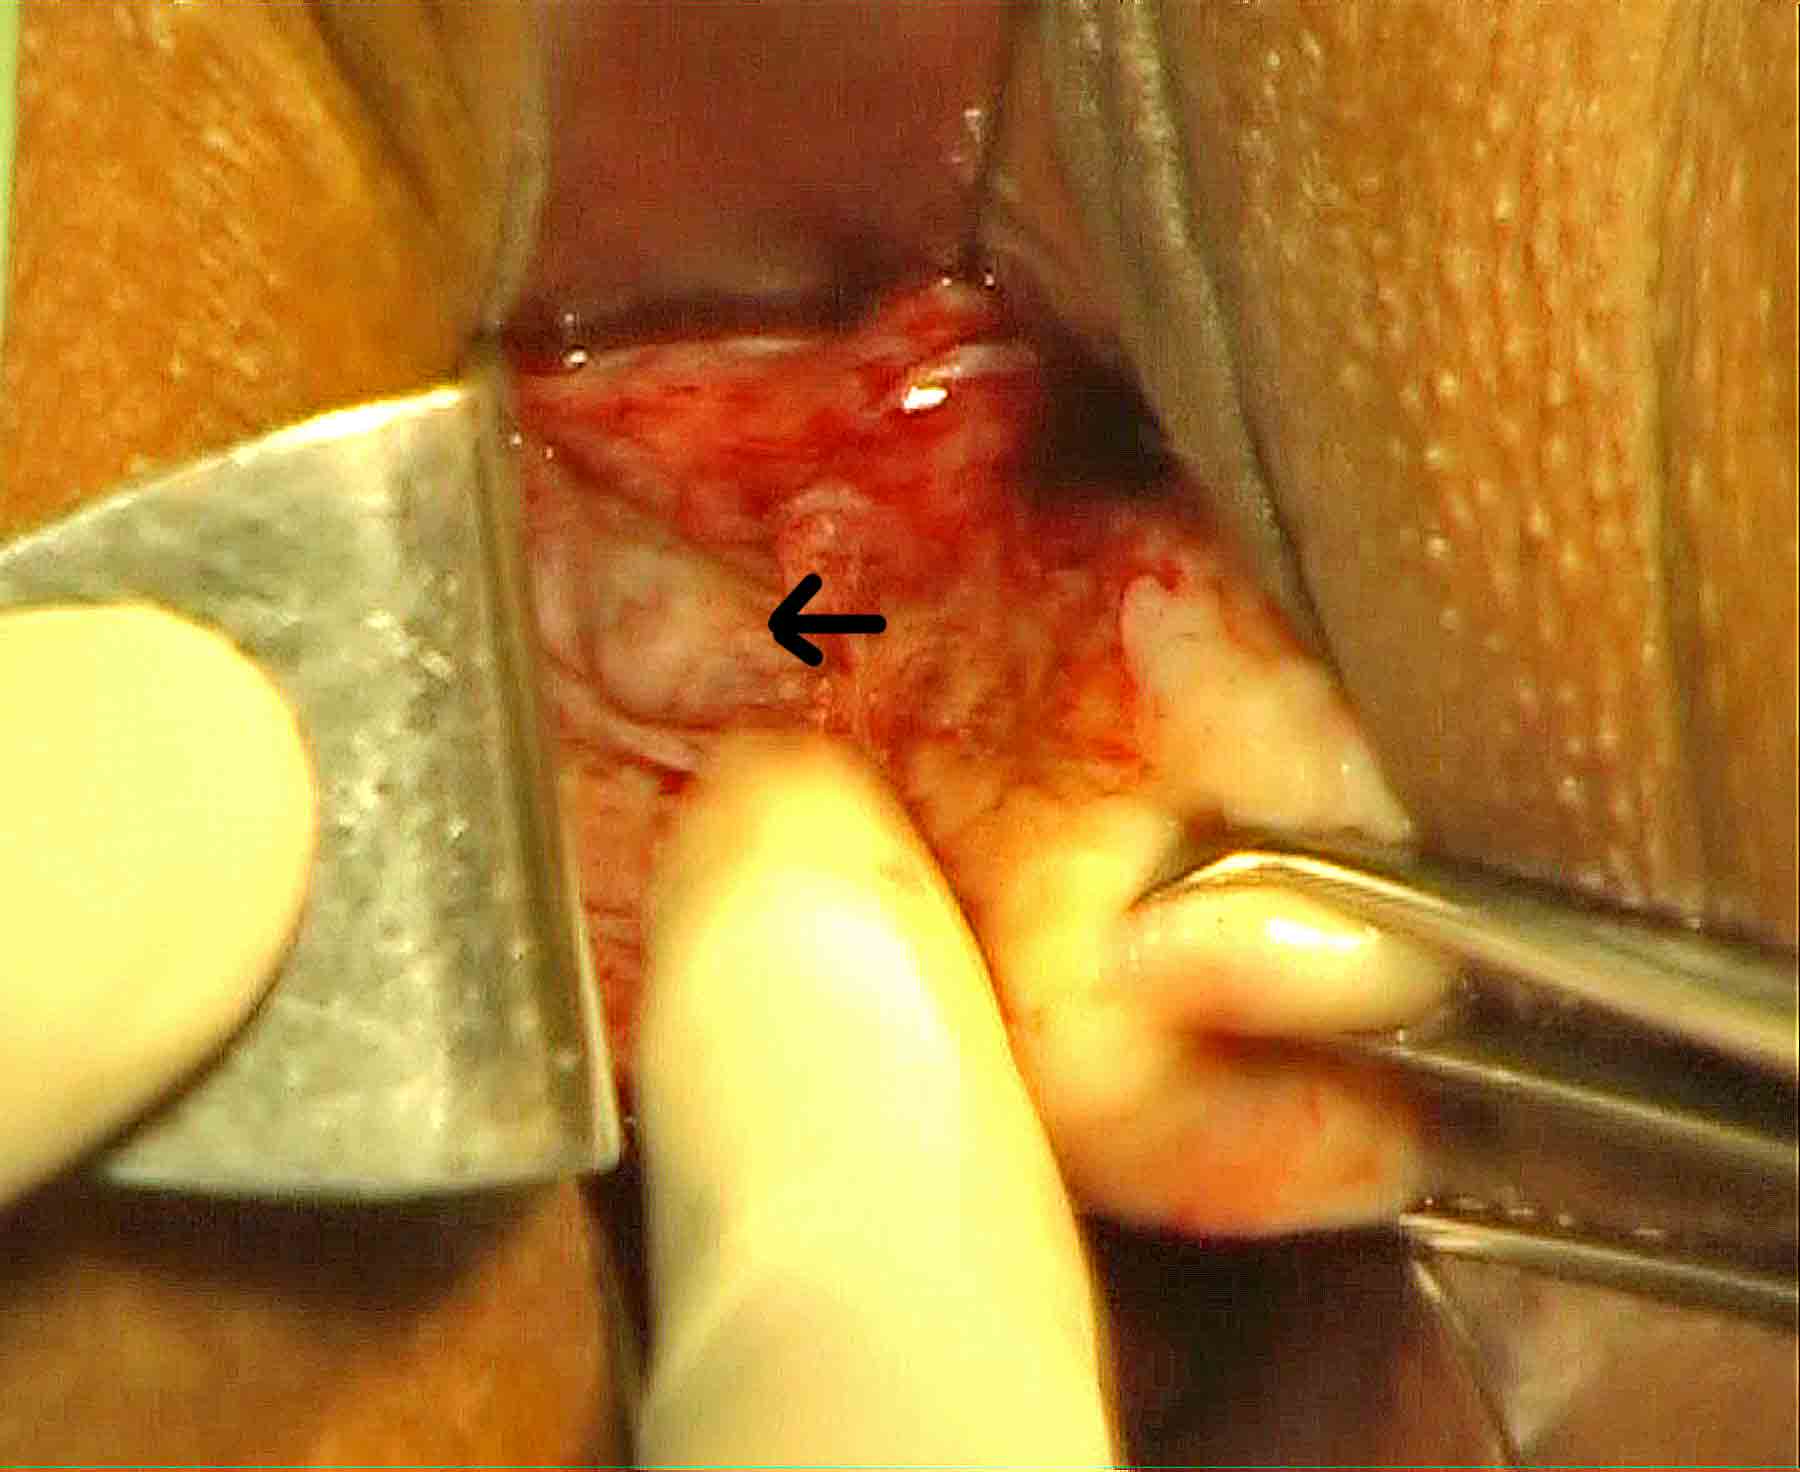
Figure - 7
The visible bulge of artery of about 2-3cms is the tortuous part of the uterine artery before it becomes ascending branch. The bulge is not seen occasionally. The loose tissues covering the artery is dissected by the right angle forceps from the posterior aspect, cauterized, and incised to expose the bulge of artery. Bring the right angle forceps, direct its tip forward. Tip of right angle forceps is brought in contact with the posterior aspect of the bulge of the uterine artery, and then the tip of the right angle forceps is inserted between the bulge and uterine wall. Hook the skelitonised artery by its bend(Figure 8,9). Spread the mouth of right angle forceps, stretch, and spread that portion of the artery between the prongs of forceps( Figure 8,9).
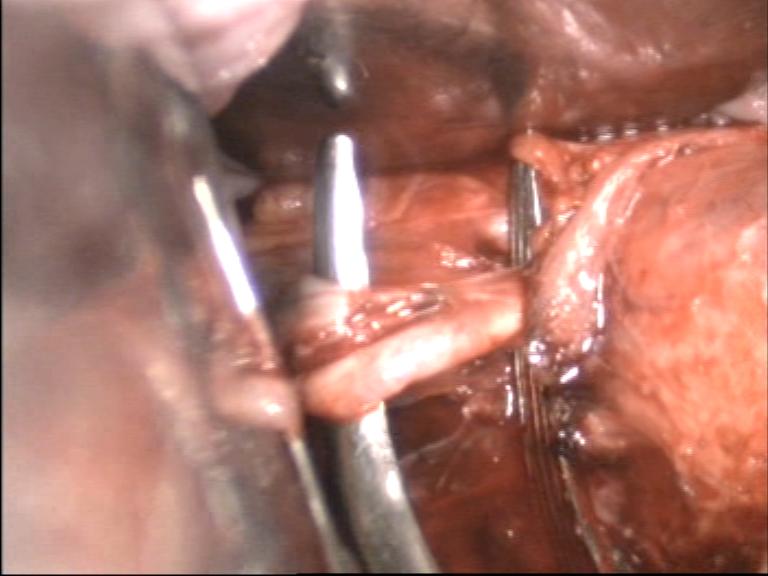
Figure - 8
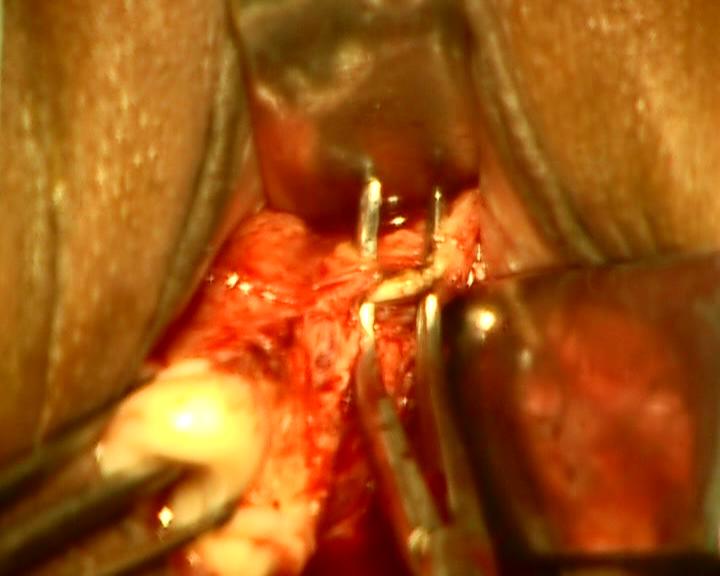
Figure - 9
Now, apply the bipolar forceps between the prongs of right angle forceps, cauterize the artery, and then divide it by scissors between the prongs of right angle forceps. This approach is termed, as PUROHIT approach to uterine artery. It is the interesting step of operation. The right angle forceps helps in dissecting the tissue planes. It elevates and stabilizes the target tissue from posterior aspect. It isolates the artery and creates a safe working space between its opened prongs for bipolar forceps and scissors, and thus protects the neighboring ureter. We did not need to use clamps, needle holder, and suture. Do not use suture. Ordinary bipolar forceps was preferable for achieving better coaptation by manual comPssion of lumen between its prongs than the spring operated laparoscopic bipolar forceps. Two to three successive strokes of coagulation along the length of arterial wall (about 1 cm) are sufficient for achieving complete hemostasis. Bleeding end of artery if any was easily held by one artery forceps and its proximal part is cauterized to achieve complete hemostasis.
Recent addition Tip of the right angle forceps is applied from the anterior aspect between bulge and lateral uterine wall(Figure10).

Figure - 10
The bulge of uterine artery is then hooked by the bend of forceps. Indications-less uterovesical space in cases of previous cesarean section, large uterus, and tortuous uterine artery. No finger is used to push the stump of uterine artery.
In this extraperitoneal technique, after division the uterine artery stump protrudes itself ahead of the soft fascia between leaves of broad ligament, remains in its natural position and does not retract (Figure 11,12,13).
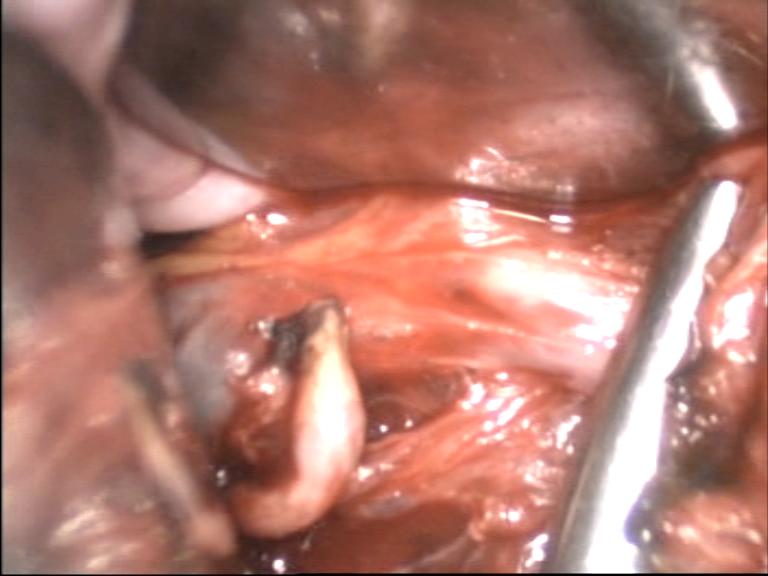
Figure - 11

Figure - 12
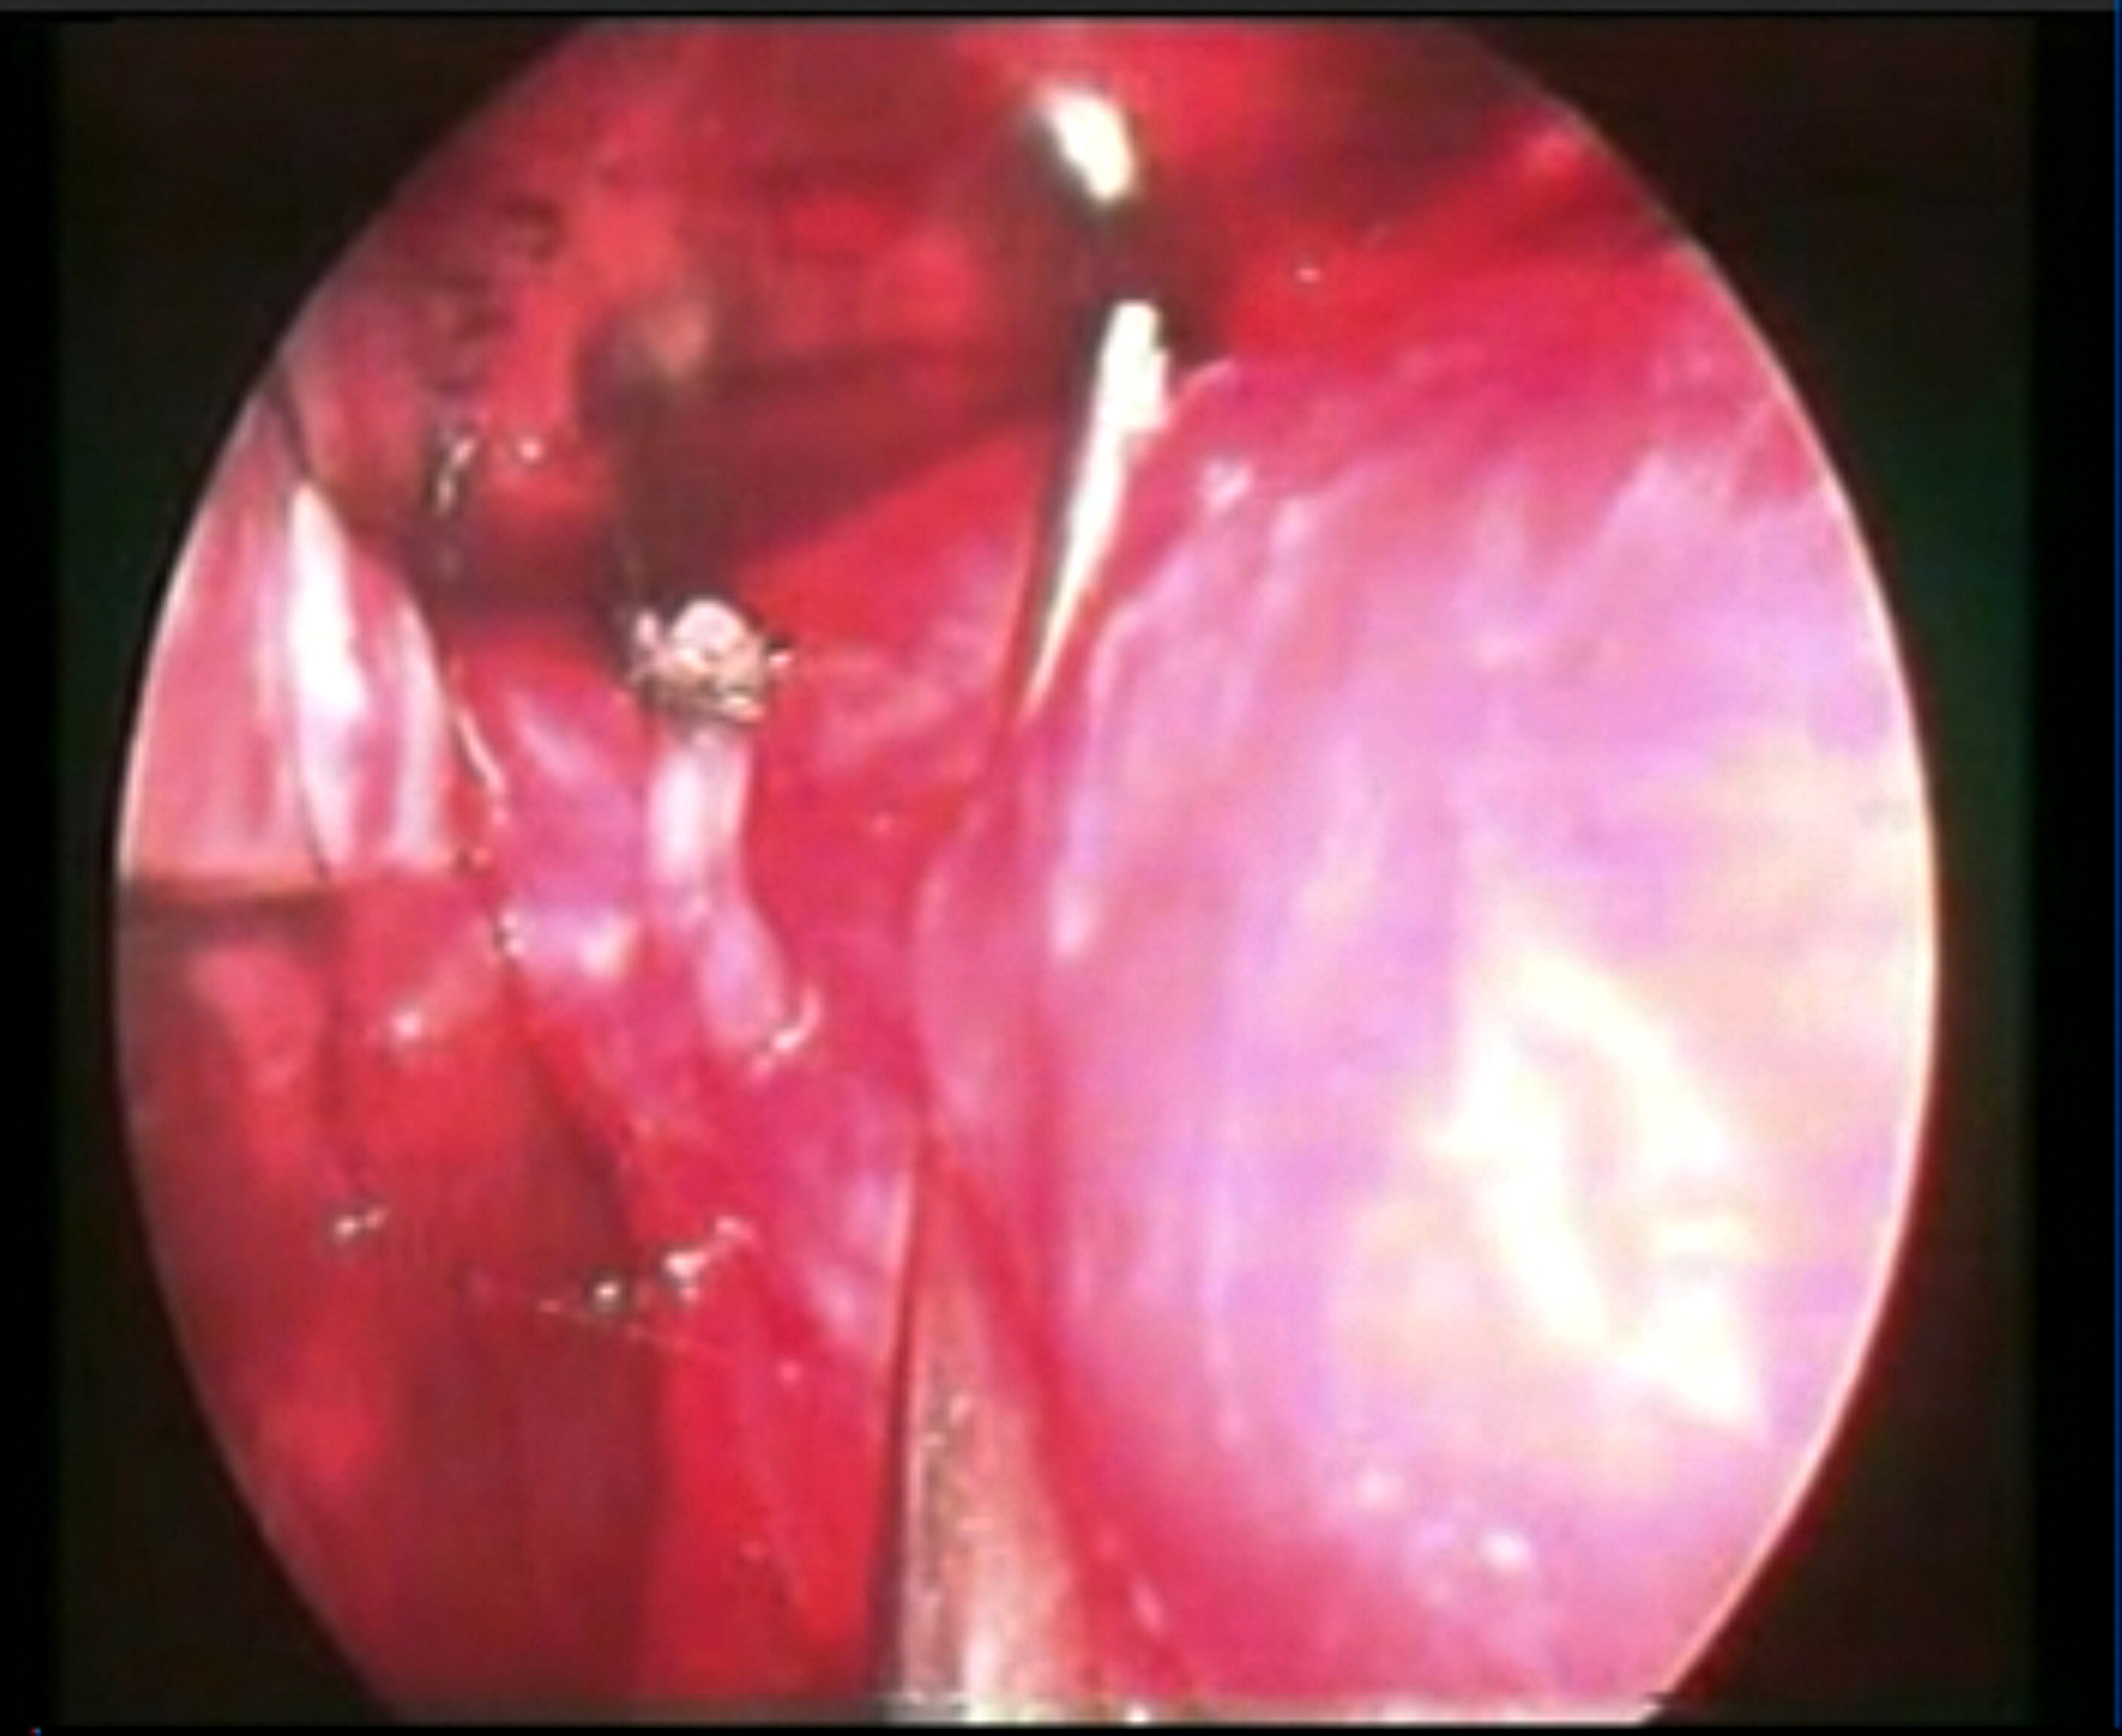
Figure - 13
A bleeding uterine artery never retracts away from field of vision. It can easily be caught by an artery forceps and cauterized. in contrast to the conventional intraperitoneal techniques that includes peritoneum in the suture ligation.Separation of artery with posterior peritoneum from the lateral wall of uterus by scissors in the conventional intraperitoneal techniques immediately moves the stumps away from the field of vision and to the lateral pelvic wall. Peritoneum has the tendency to recoil to its natural position at lateral pelvic wall immediately after separation from lateral uterine wall as a result of release from the downwards traction on cervix. In this case, cervix is pushed up in to the pelvis and bleeders are retrieved. The divided lower end of the ascending branch on the sidewall of uterus is identified to confirm the division of the uterine artery. It is cauterized to prevent back flow bleeding. The above procedures are repeated on the other side to secure both uterine arteries extraperitoneally. Now, pull the cervix anteriorly to stretch the posterior cul-de- sac peritoneum. Grasp and stretch the peritoneum by an Alli’s forceps. Then incise the posterior cul-de- sac peritoneum to proceed intraperitonally. Hold the posterior peritoneal margin by Alli’s forceps. Insert the speculum in to the cul-de- sac anterior to Alli’s forceps and then remove the Alli’s forceps. Bring the right angle forceps. Insert the tip of right angle forceps in to the cul-de-sac and move it to the notch between the posterior uterine wall and posterior leaf of broad ligament. Elevate and hook the posterior leaf of broad ligament and uterosacral ligament from their posterior aspects. Spread between prongs, (Figure 14) coagulate close to uterine wall, and then divide between the prongs of forceps.
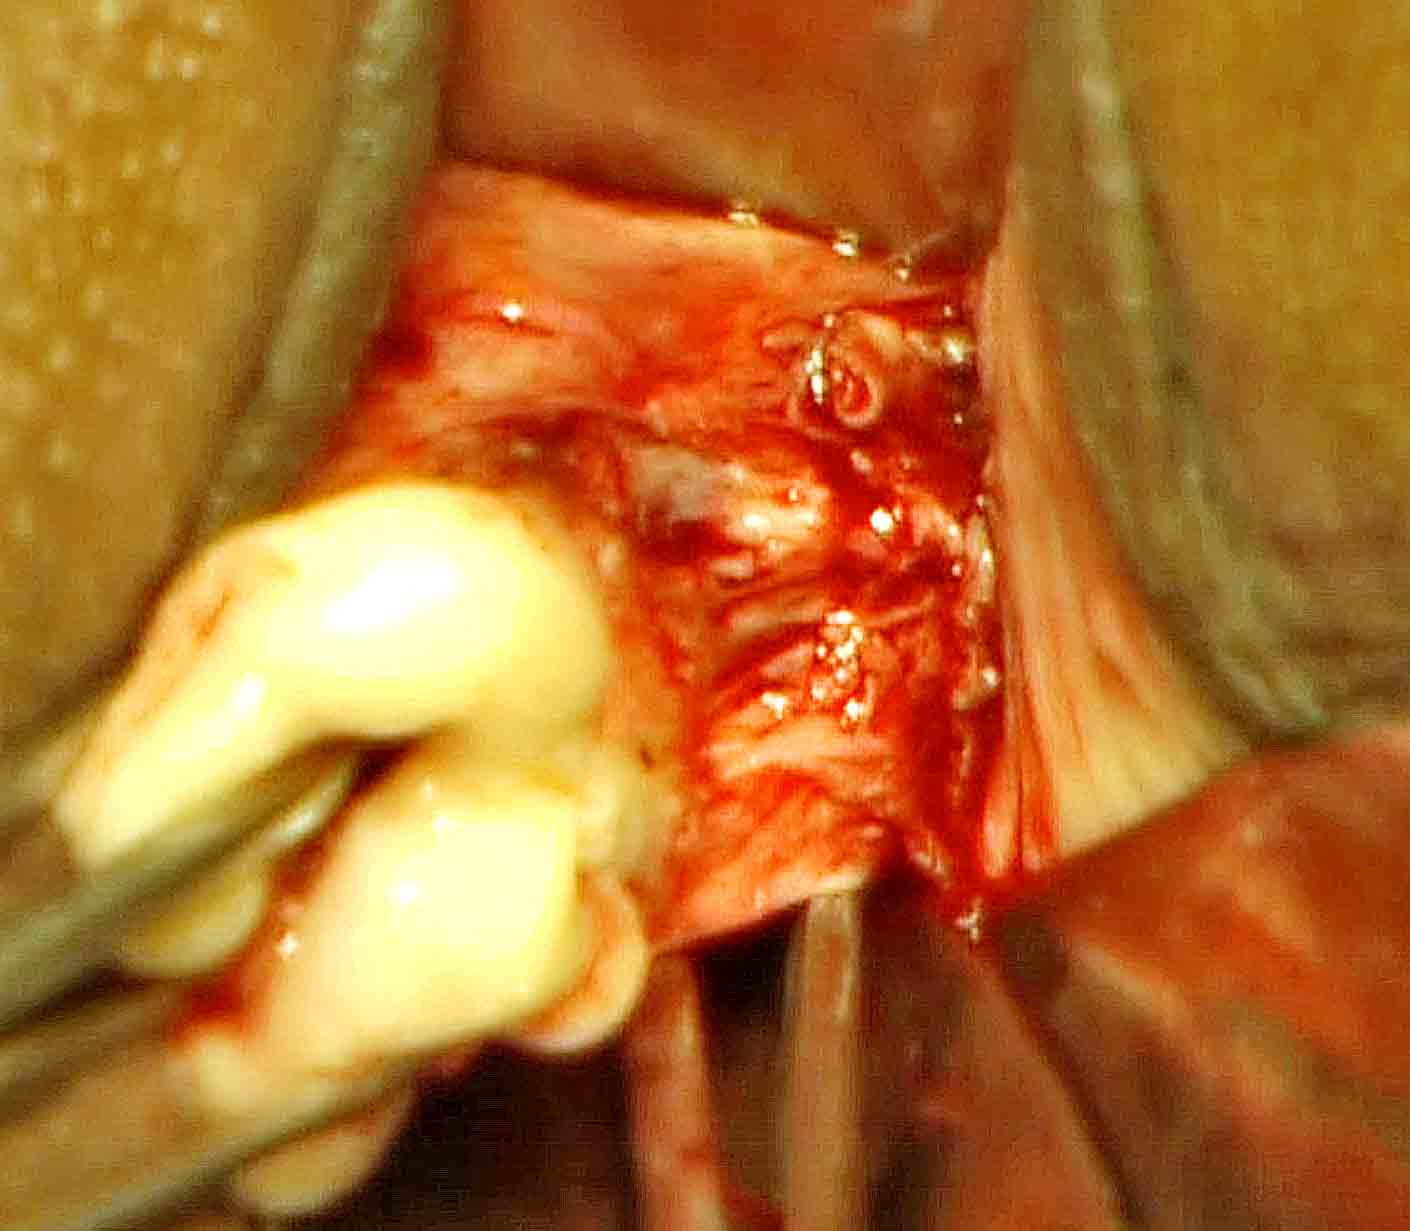
Figure - 14
It requires 2-3 successive applications to reach a level above the stump of uterine artery along the lateral wall of uterus. The above procedures are repeated on the opposite side to separate uterosacral ligaments bilaterally. These maneuvers further enhance the descent of the uterus, bring down the anterior cul-de-sac to surgeon’s view, and make the lower half of the uterus bare and free of broad ligament. Then the anterior cul-de- sac is incised. Retractor is inserted in to the anterior cul- de -sac.Vesicouterine peritoneum on either side is coagulated and separated from uterus. Again, insert the tip of the right angle forceps to the notch between posterior wall of uterus and posterior leaf of broad ligament. Spread the posterior broadligament between the prongs, coagulate close to uterine wall, and then divide between the prongs of forceps. It will further enhance descend of the wider corpus of uterus. Similarly, the ovarian ligament, round ligament and tube are hooked and spread between the prongs of forceps(Figure15).
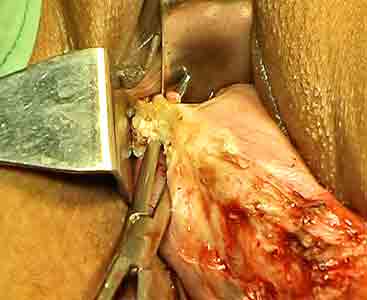
Figure - 15
Step by step, coagulate them and cut from below upwards to separate the upper pedicles from uterus. Hold the round ligament stump by an Alli’s forceps before finally separated from the uterine cornue. These maneuvers are repeated on the opposite side to separate uterus completely from the body. No ligation or stay suture is used up to that stage. Uterus is removed. Right angle forceps is used to hook them usually from posterior aspects and occasionally from the anterior aspect(Figure 16).
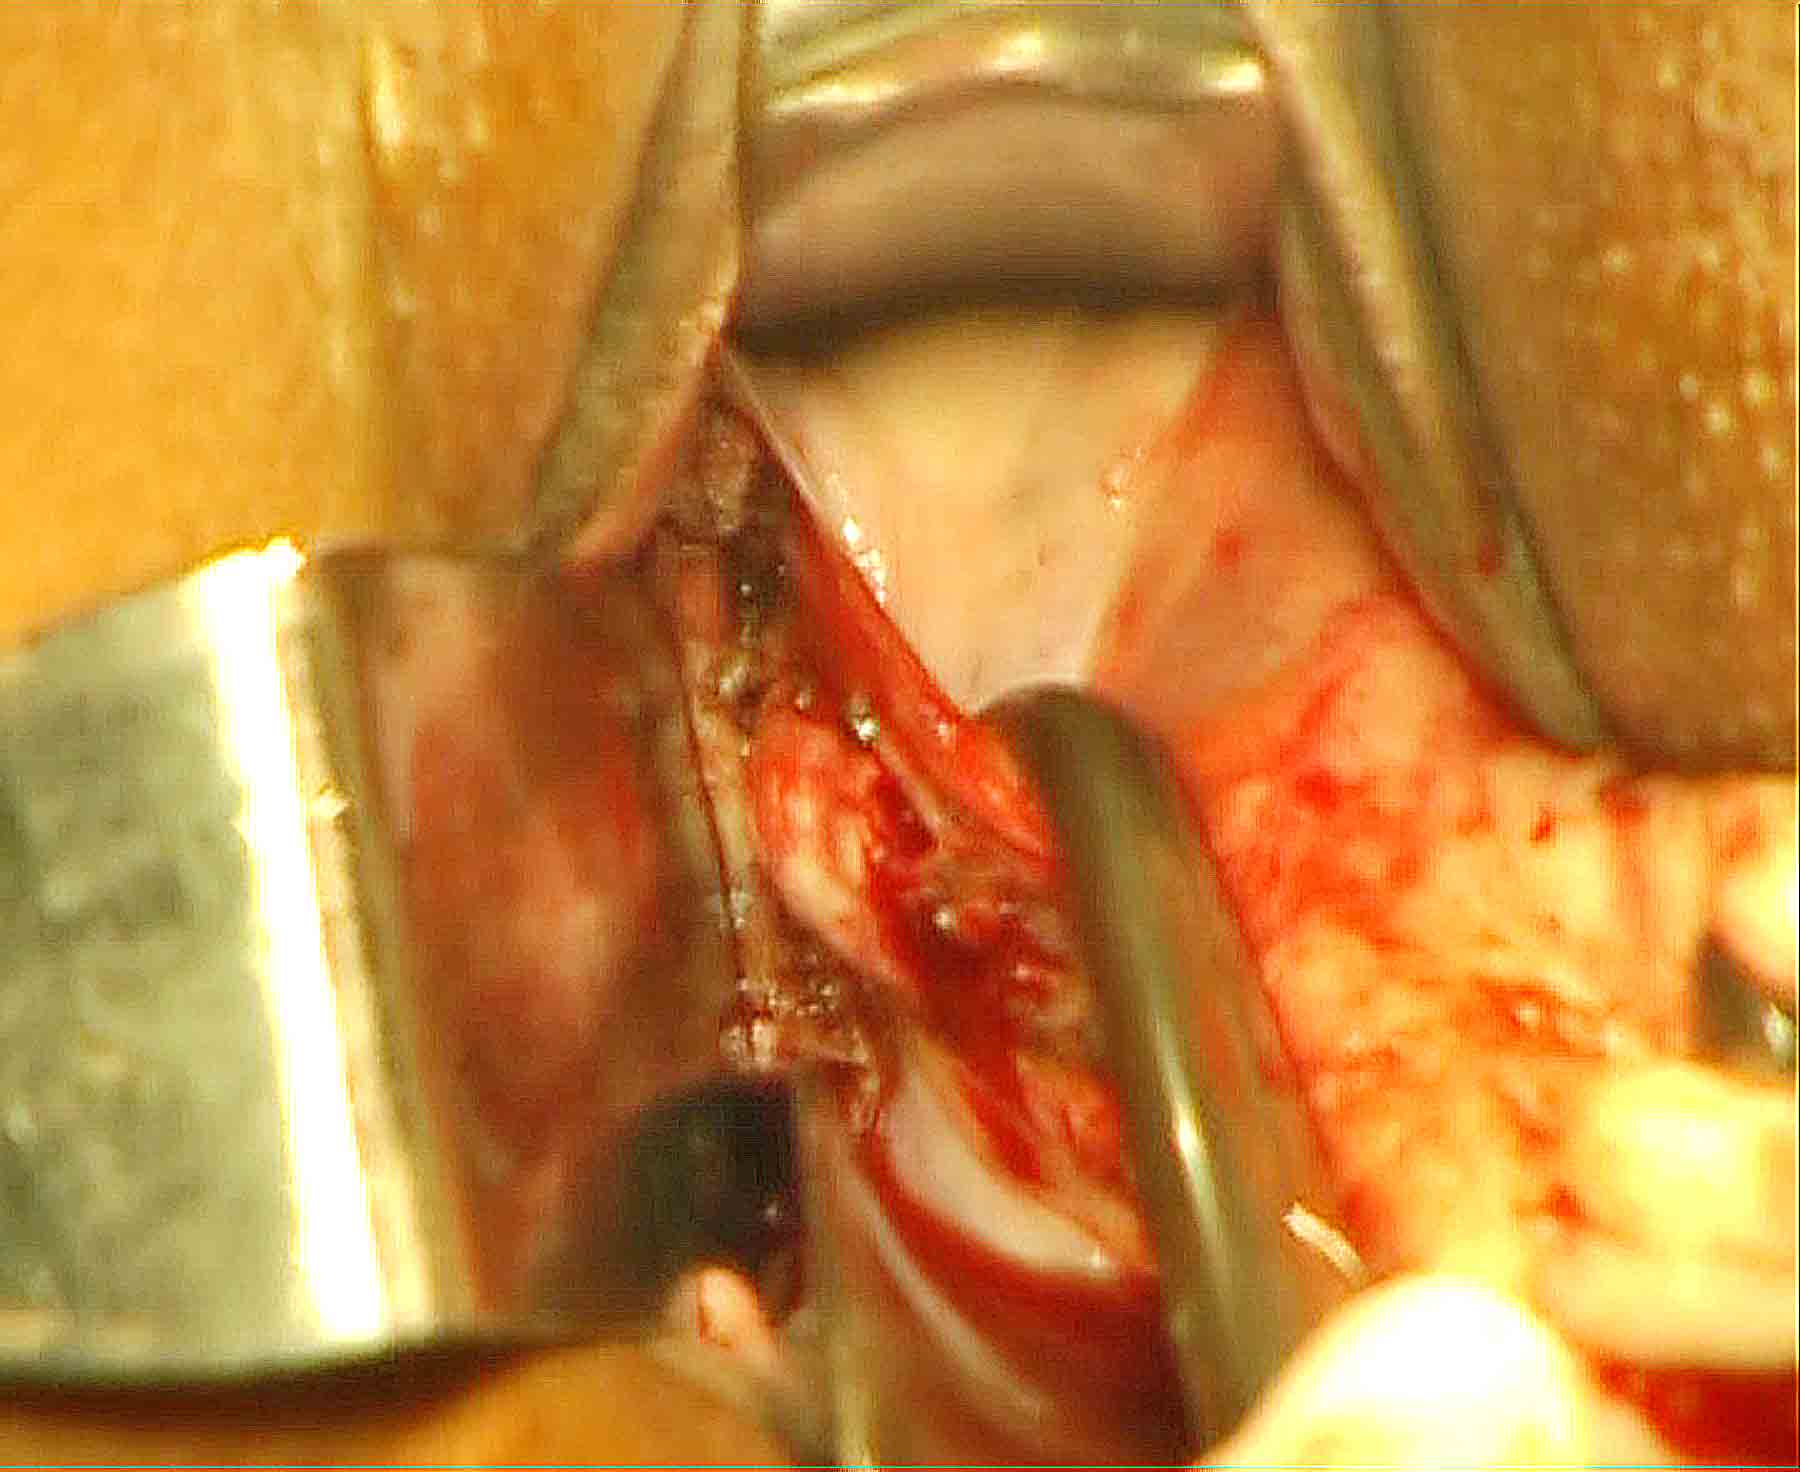
Figure - 16
We do not use clamps. Occasionally, tip of the right angle forceps is used to push the wider cornual part to the opposite side to get space for bipolar forceps and scissors. Now, give traction on the Alli’s forceps holding the round ligament. By another Alli’s, forceps hold the ovarian ligament stumps. A third Alli’s forceps holds the tubal stump. These stumps are examined and coagulated if needed to achieve complete hemostasis. The above procedures are repeated on the opposite side to achieve hemostasis. Salpingo oophorectomy is performed at this stage in indicated case by the procedure described below.
Tracing technique to achieve effective hemostasis of the lateral wall:

Figure - 17
Tracing may be difficult in case of conventional technique that includes peritoneum in the bunch suture ligation of stumps. Lavage of the pouch of Douglas is done routinely by normal saline in a syringe. After satisfactory hemostasis vault is closed with vicryl no one and by our special vault closer technique described below.
Vault Closure Technique
1.Lateral angle fixation Speculum and retractors stretch vault margins. Hold the lateral wall margin of one side by Alli’s forceps. Stretch the posterior vault margin by speculum.Now; Hold the uterosacral ligament stump by two Alli’s forceps one on the upper end and another on the lower end of the thick stump(Figure 18).

Figure - 18
Suture the lateral vaginal wall to the uterosacral ligament (by vaginal wall-uterosacral-uterosacral-vaginal wall 4 points suture)(Figure 19,19 A).
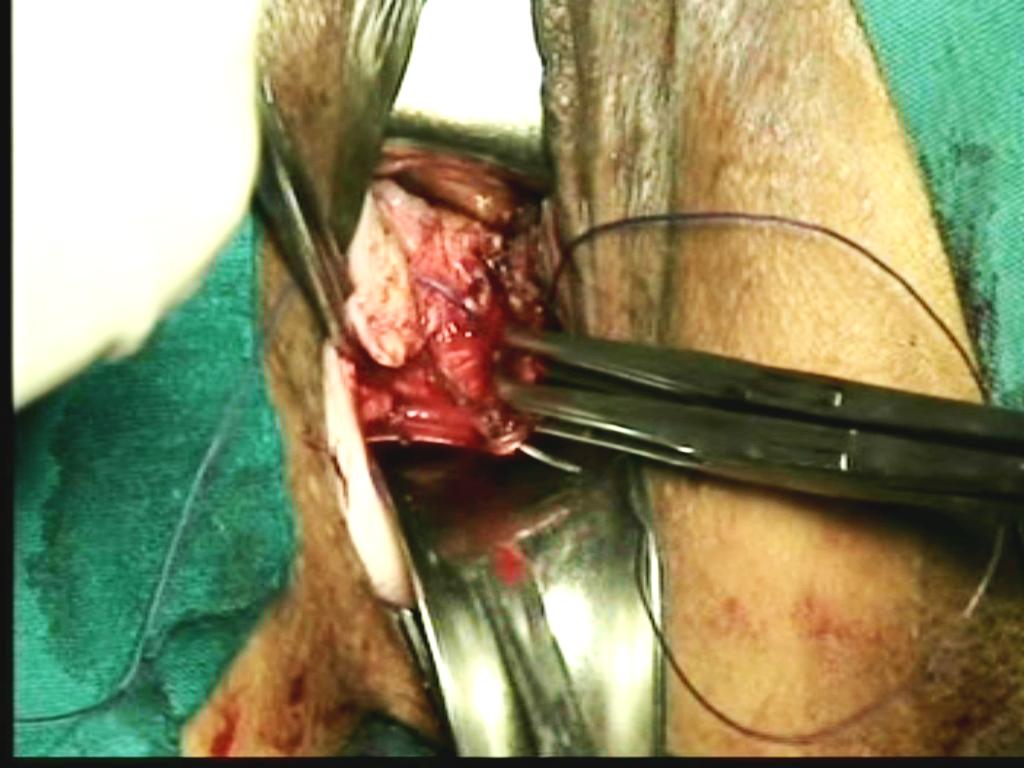
Figure - 19
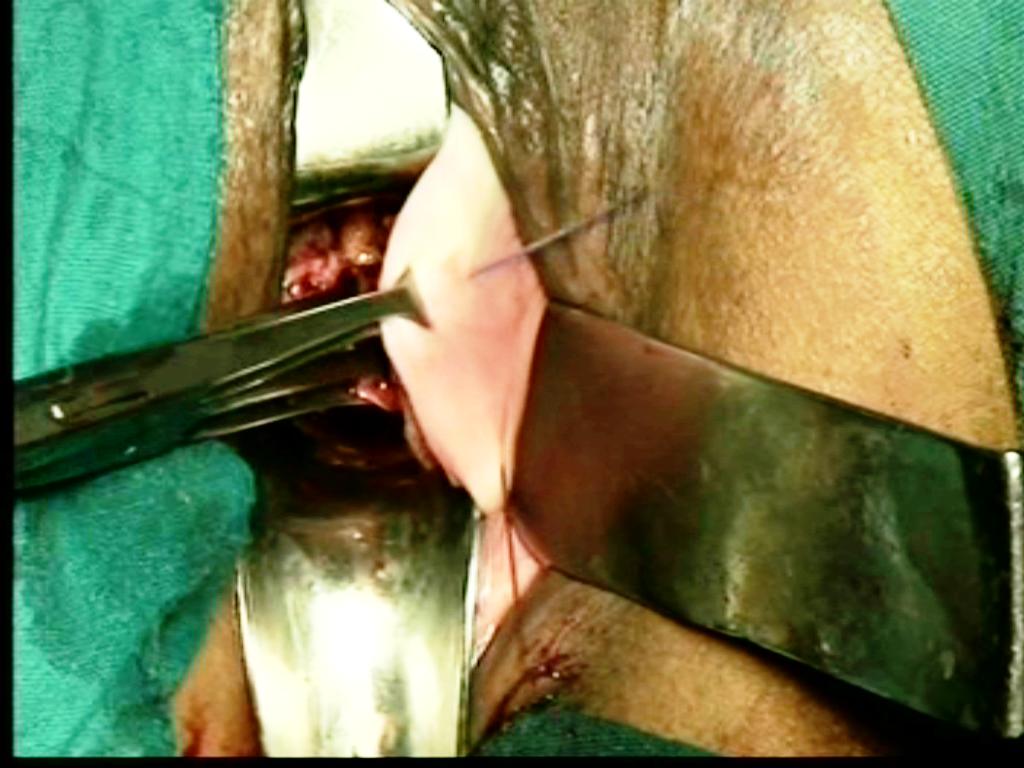
Figure - 19A
Do not include cardinal ligament. The procedure is repeated on the opposite side. Lavage of the pouch of Douglas is done routinely by normal saline in a syringe.
How to identify uterosacral stump: Sharp cut and thick stump on the lateral wall, continuous with the thin broadligament above and thin peritoneum of posterior pouch below. Medially, smooth peritoneal surface, laterally rough cardinal stump. Hold the uterosacral stump by two Alli’s forceps one the on upper end and other on the lower end. Hold both Alli’s forceps; Upward and downward pull of the Allis forceps move the patient and confirms uterosacral ligament. Uterosacral ligament does not break with the pull. Other structures like broadligament, adhesions, and posterior peritoneum break with pull of Alli’s forceps. Then, the uterosacral ligament is sutured to the lateral vaginal wall to get a strong support.
2. Vault plication suture: Anterior margin of vaginal vault is stretched by two Allis forceps one on either side of midline. The tip of the right angle forceps is swept gently on the posterior bladder wall from above and towards the vault margin. The tip enters to a notch between posterior wall of bladder and supravaginal septum. Now, the tip of right angle forceps is directed anteriorly and opened to spread the anterior vaginal wall. Insert the needle with suture (outside- to- inside) carefully through the anterior vaginal wall between the tips of right angle forceps.(Figure-20)
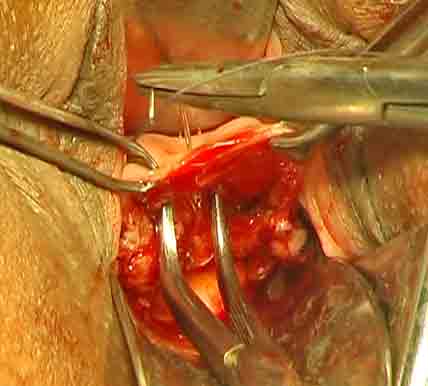
Figure - 20
It does not enter the bladder. The anterior retractor retracts the anterior vault margin. Remove the Alli’s forceps. Hold the lateral vaginal wall margin distal to fixation knot on left side. Insert the needle just medial to vaginal wall (needle is inserted antero posteriorly), (Figure 21)
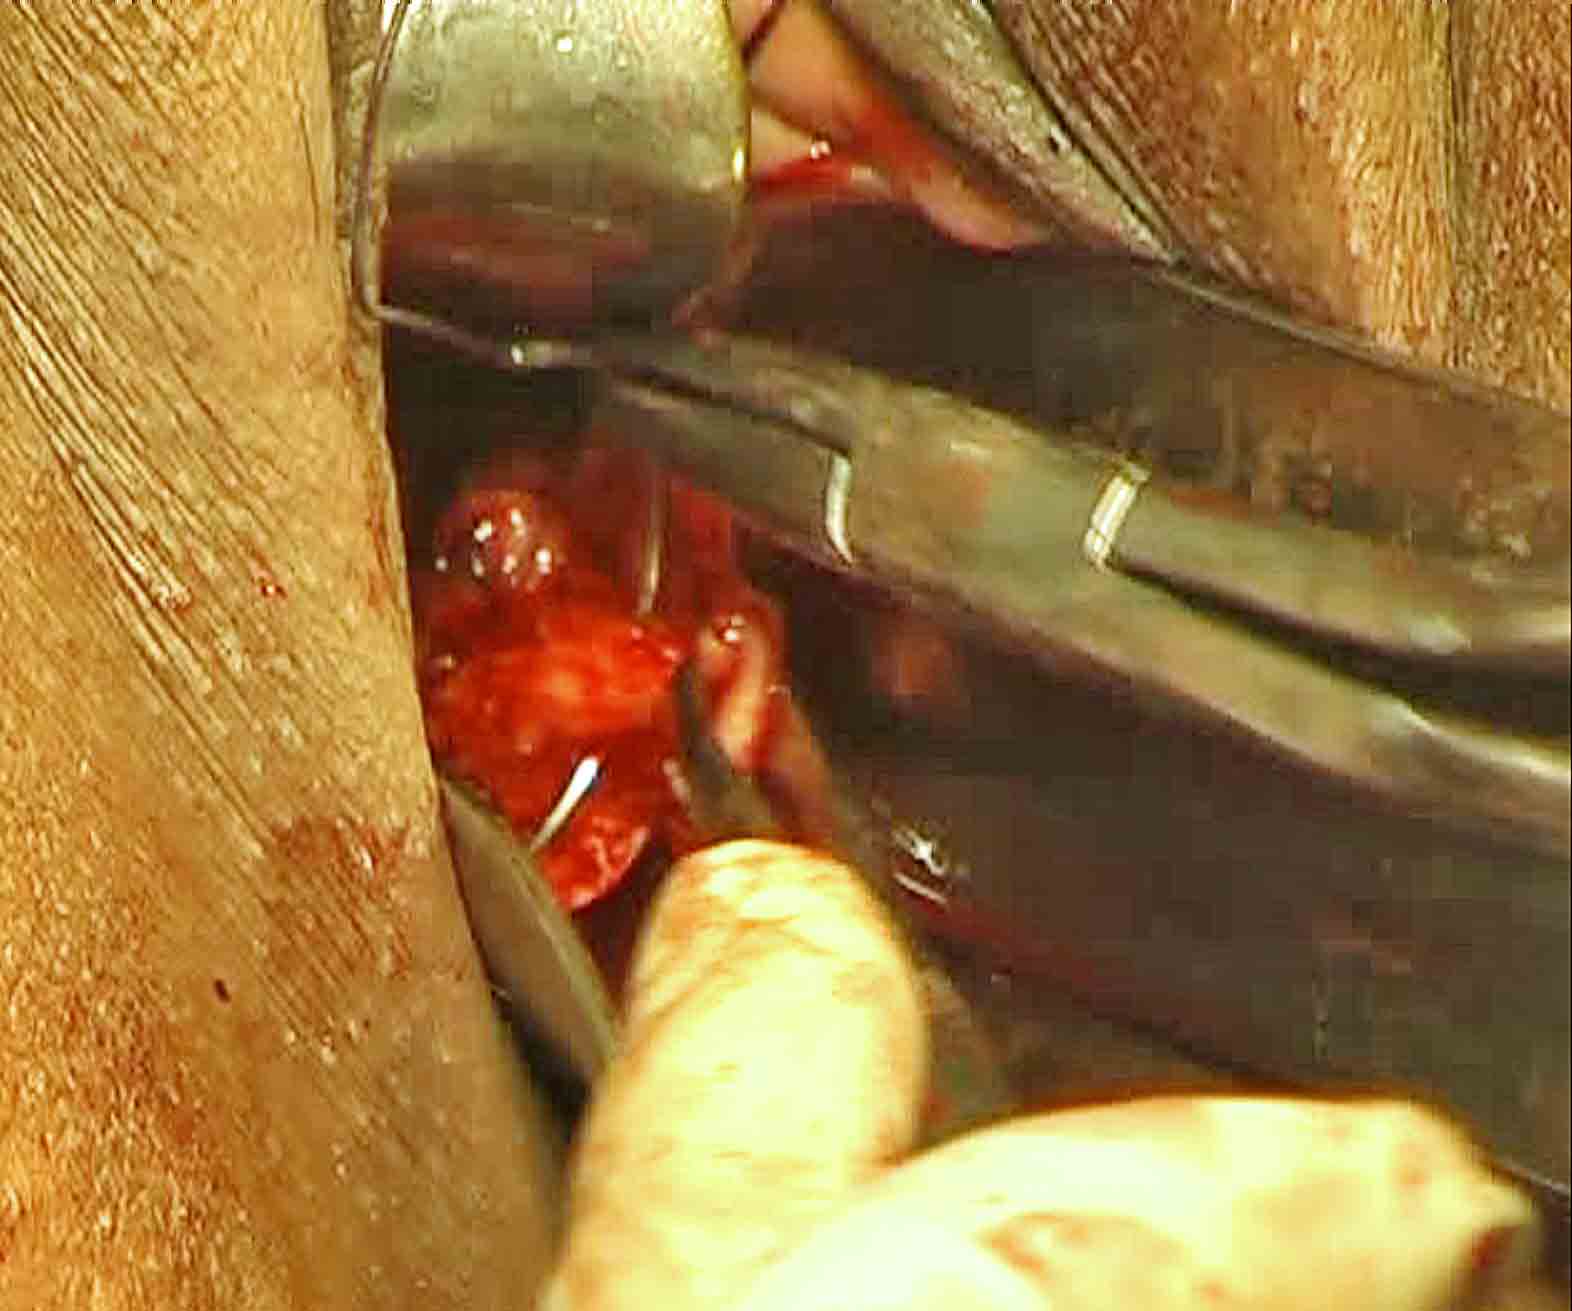
Figure - 21
Do not penetrate deep in to the cardinal ligament for fear of ureteric injury. Hold the uterosacral ligament stump. Insert the needle through the uterosacral ligament stump. Hold the posterior peritoneum. Then insert needle through the peritoneum of posterior cul-de-sac and then through the posterior vaginal wall close to midline (inside-to-outside).Again hold the posterior vault margin. Now, insert the needle through posterior vaginal wall from out side to inside on the right side of midline. Then insert through the peritoneum of posterior cul-de-sac. Hold the uterosacral ligament stump on right side. Insert the needle through the uterosacral ligament stump (needle pierces postero anteriorly). Hold the lateral vaginal wall margin distal to fixation knot on right side. Again, insert needle just medial to vaginal wall(Figure 22).
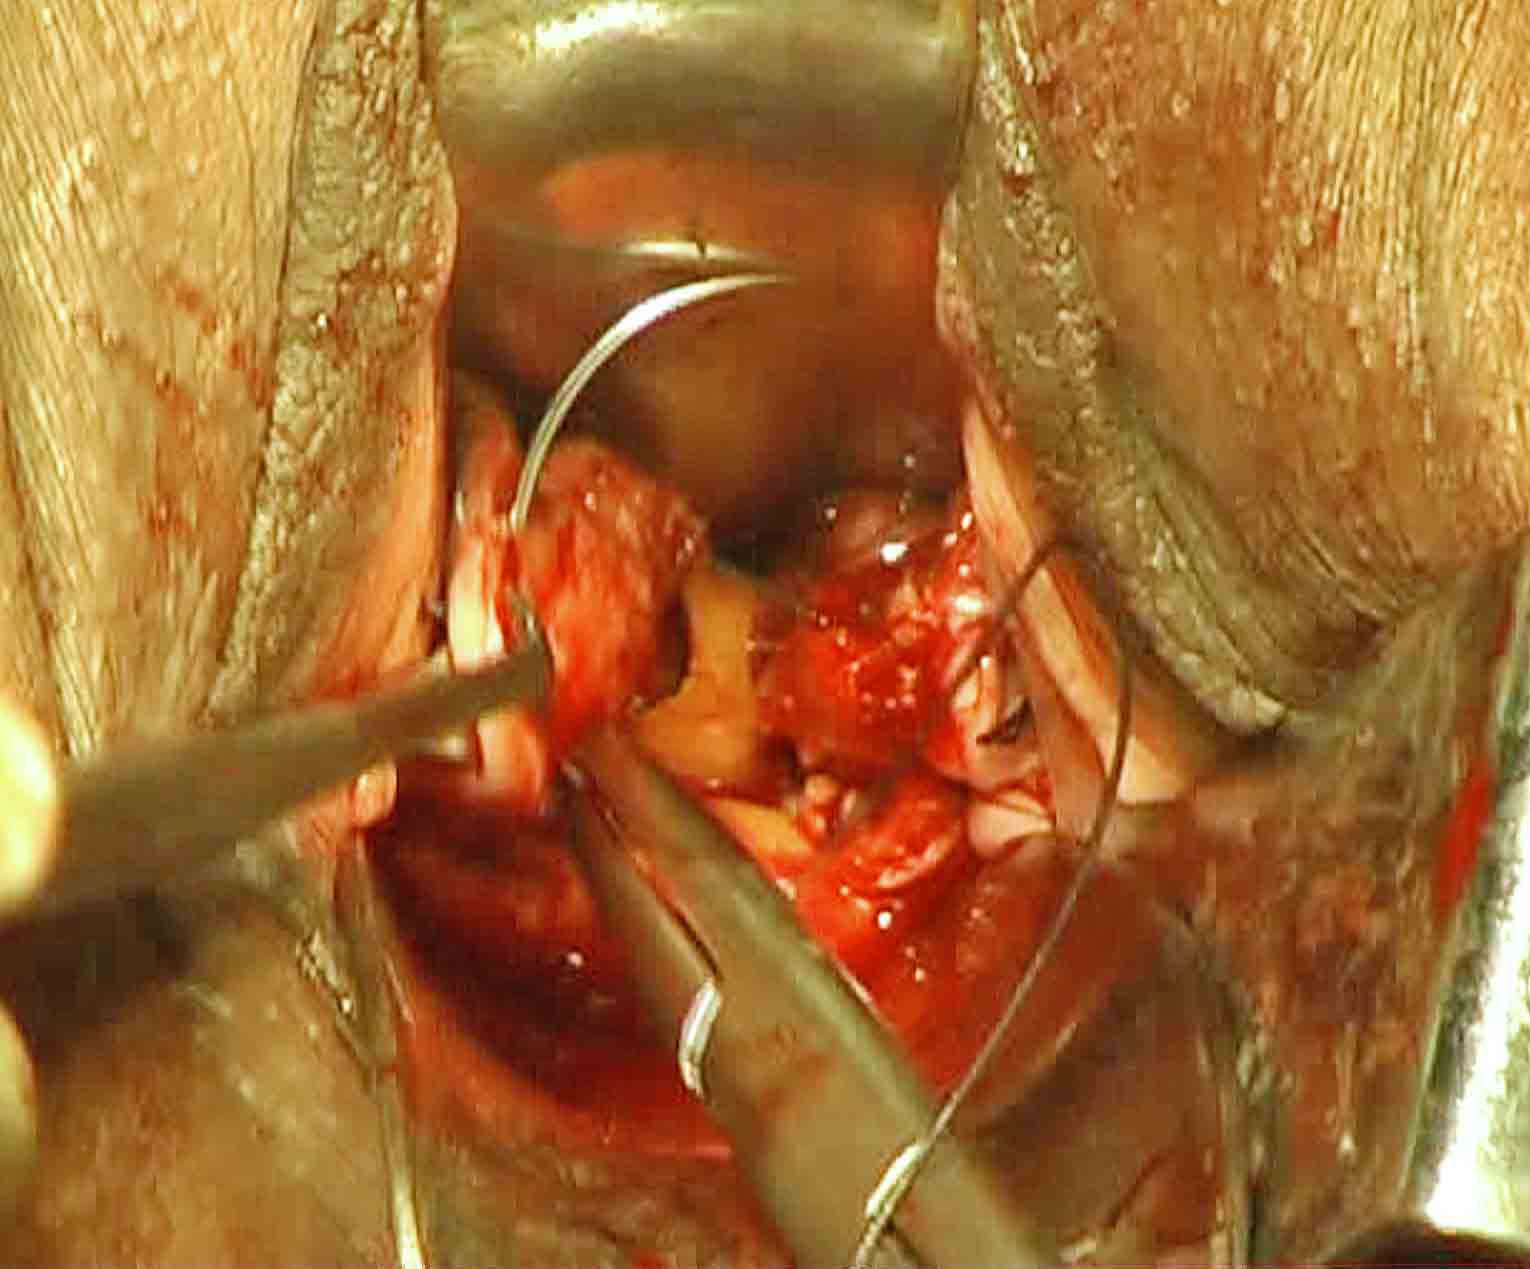
Figure - 22
Again, stretch the anterior vault margin by two Allis forceps one on each side of midline similar to the earlier one. Sweep the close tip of right angle forceps from above downward along the posterior wall of bladder. The tip enters similarly to a notch between posterior wall of bladder and supravaginal septum. Spread the anterior vaginal wall between the tips of opened prongs. Now, insert the needle between prongs of forceps from inside to out side to come out through the anterior vaginal wall(Figure 23).

Figure - 23
This suture facilitates support of vault similar to that obtained after abdominal hysterectomy. We do not use corrugated rubber drain now a days.
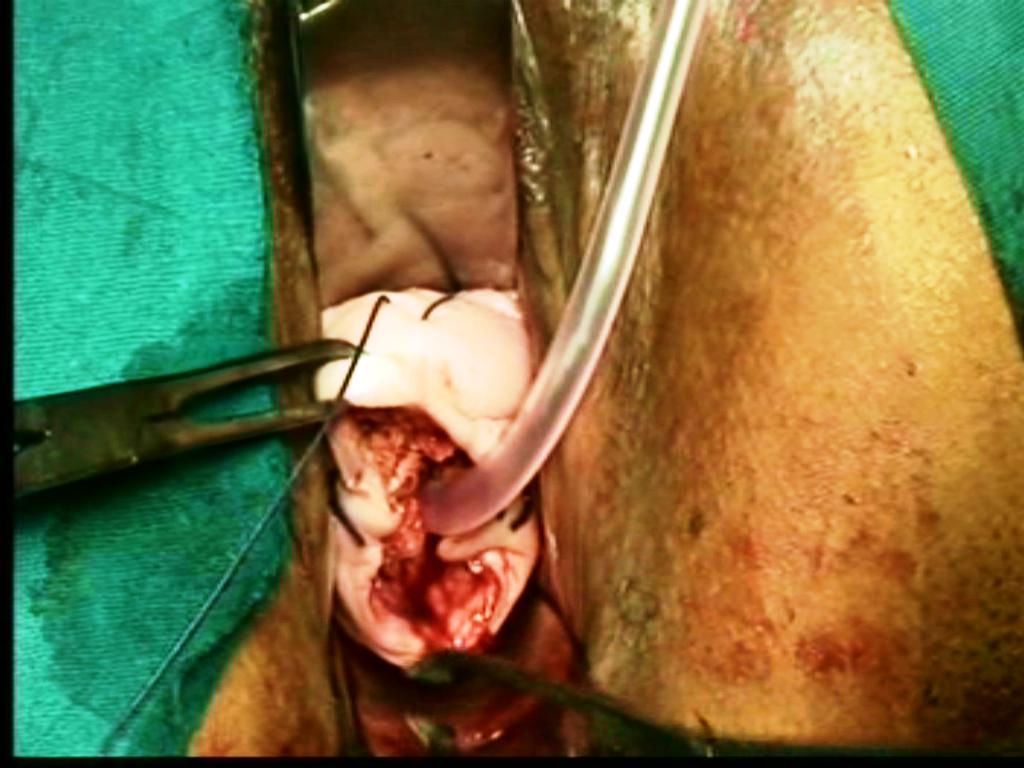
Figure - 24
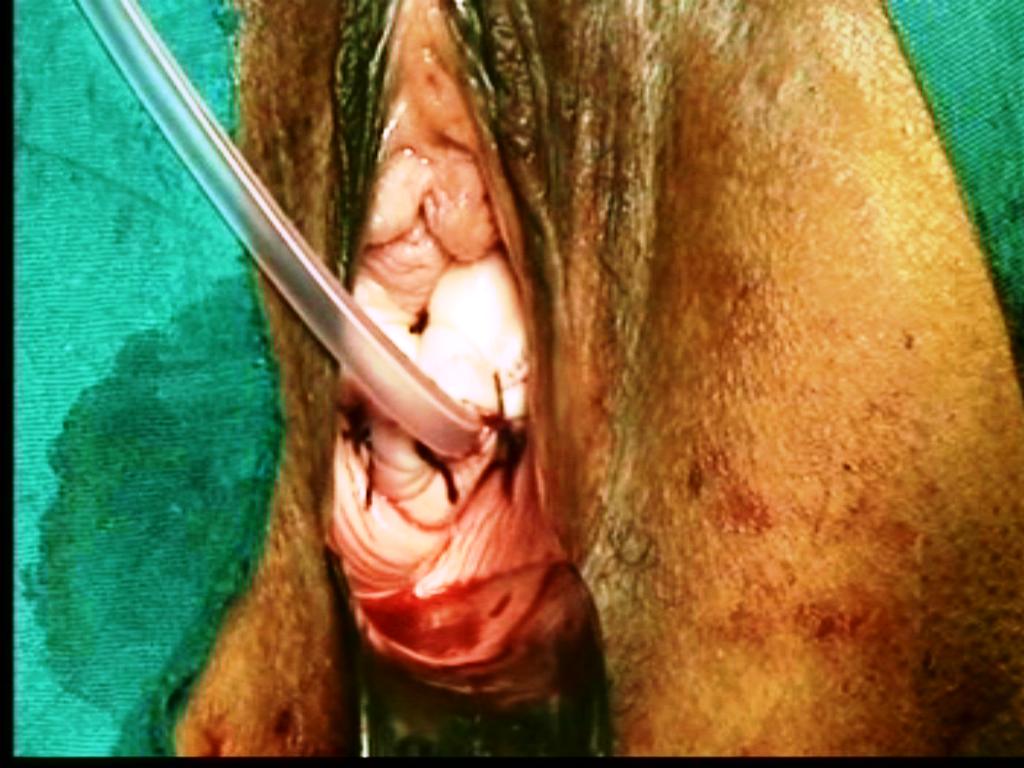
Figure - 25
3.Then, the redundant vault margins below the knot are closed from one end to other. A catheter is inserted in to urethra. By an infusion set, the Ryle’s tube is connected to a bottle of normal saline of 540 ml. Fluid is instilled in to the pelvic cavity. After completion of one bottle, the empty bottle is placed below the bed to drain the return fluid in to the same bottle (Figure 26).
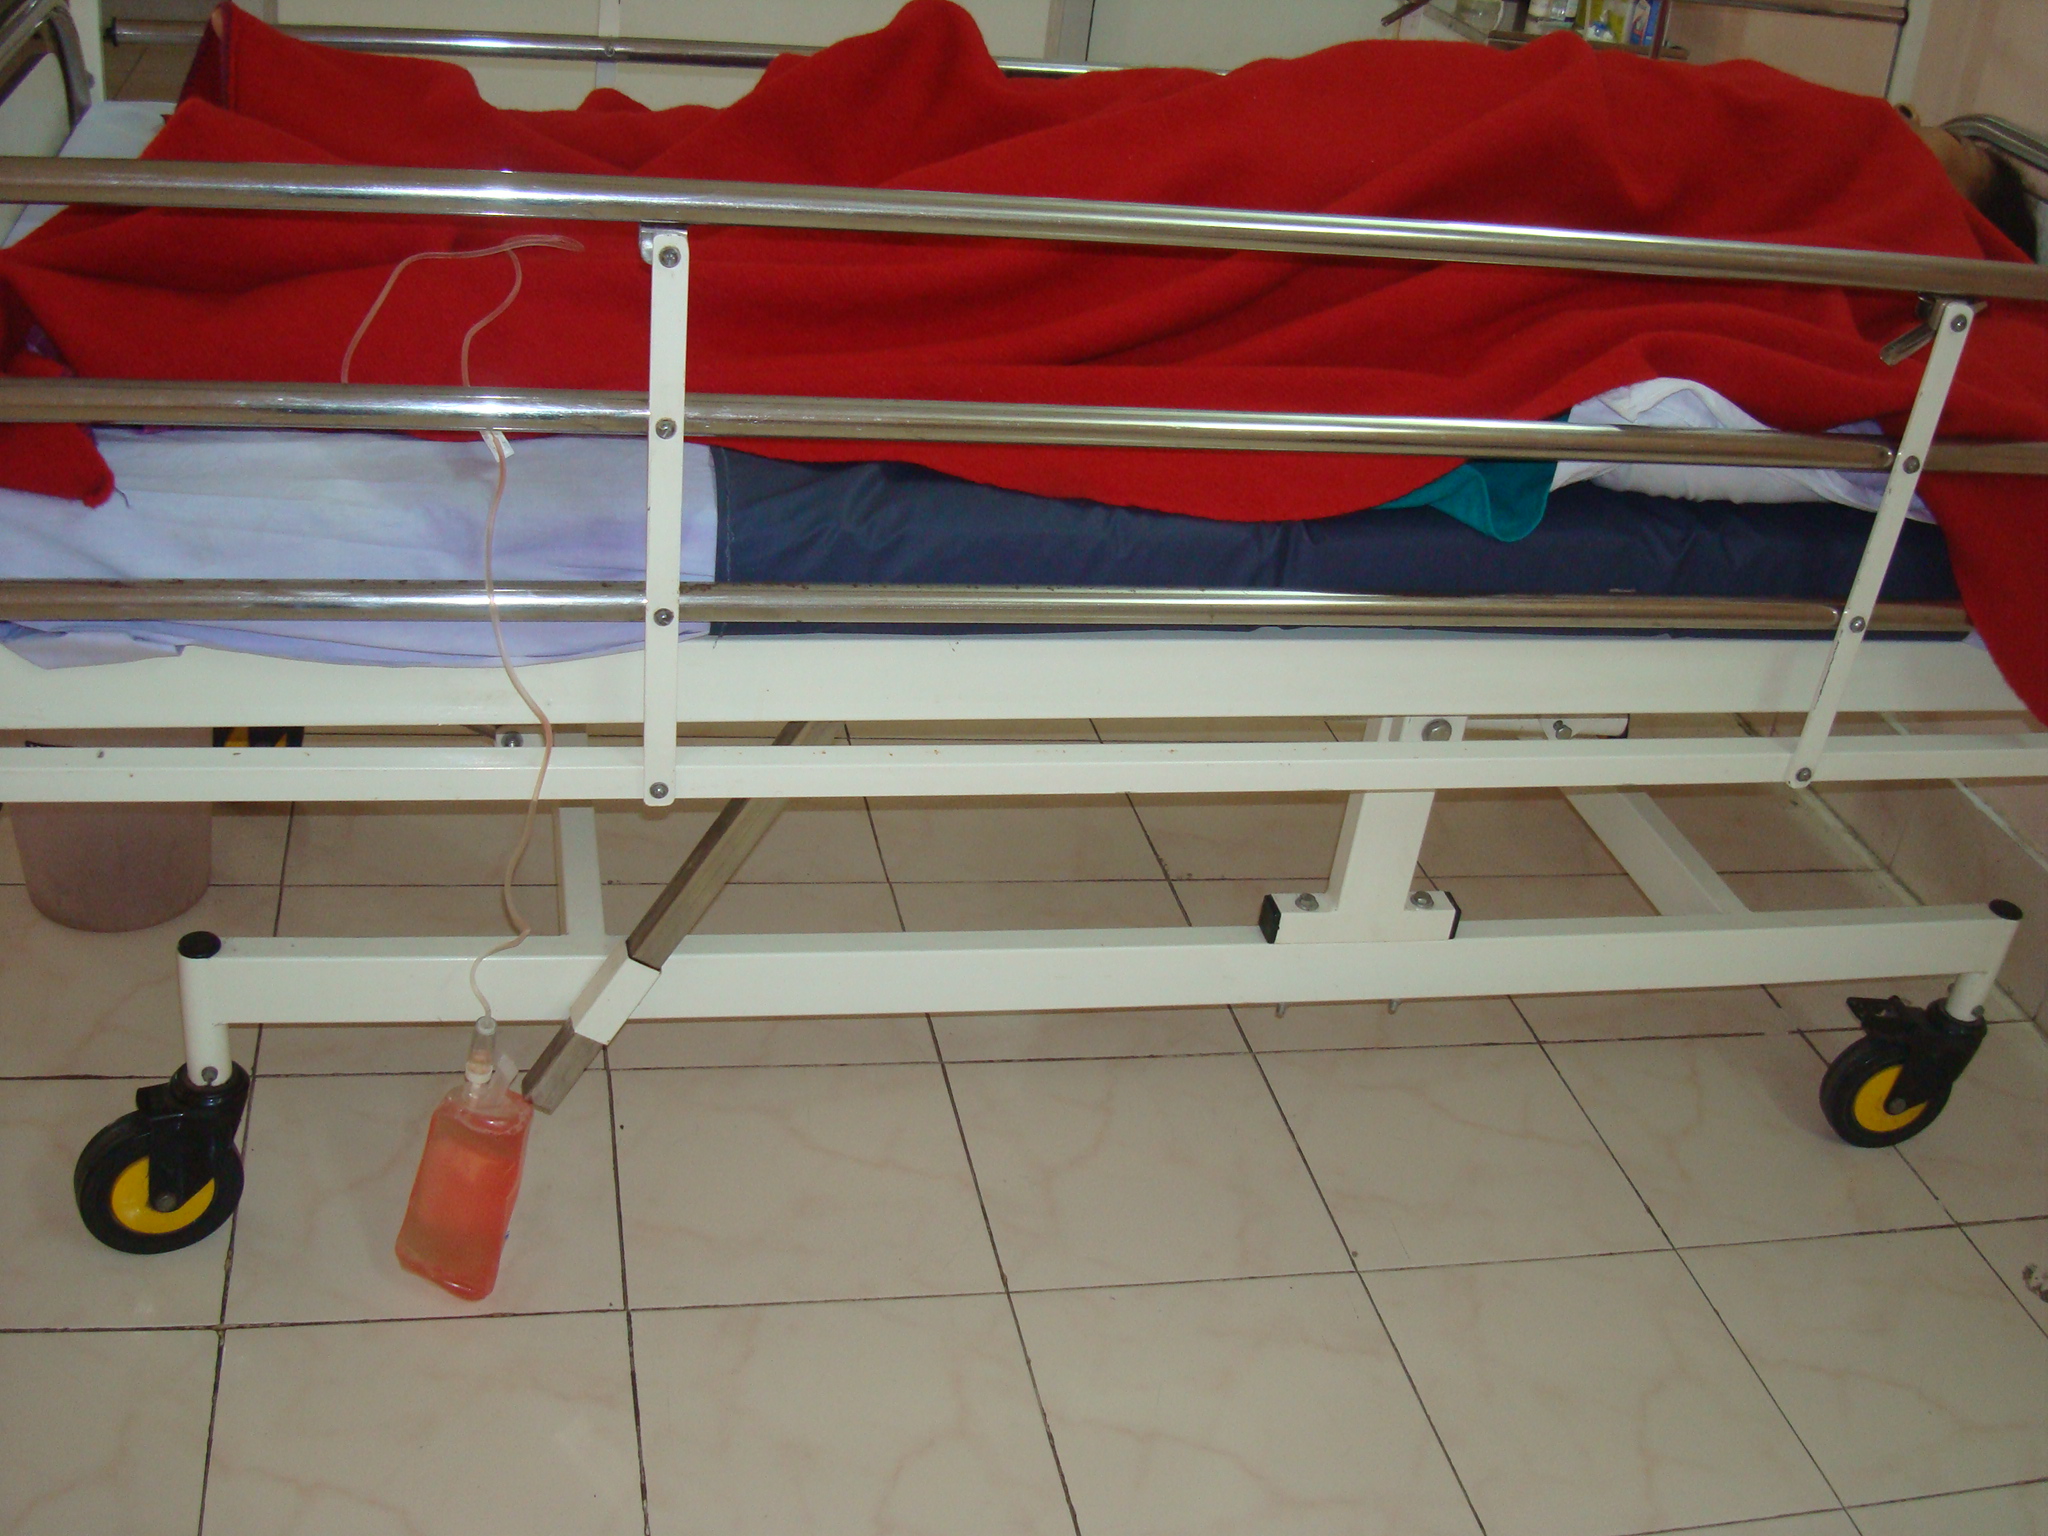
Figure - 26
In case of deep red color return fluid, repeat the instillation until you get light red color return fluid finally. The Ryle’s tube is removed after 6-8 hours. This lavage prevents pelvic hematoma and reduces pelvic pain postoperatively.
Advantages
It closes the dead dissected space between the vaginal wall and posterior peritoneum to avoid
vault hematoma.Both uterosacral ligaments supports the posterior vault margins.
This suture facilitates support of vault similar to that obtained after abdominal hysterectomy.
Postoperative features of vault after one month-vault plication sutures pull the anterior vaginal
wall upwards, both angles upwards and outwards, posterior fornix upwards and backwards, and
maintain the depth and width of apex of vagina.
It reduces the sagging of the upper part of anterior and posterior vaginal wall after hysterectomy.
It creates a strong vaginal vault support.
In a case of uterine prolapse.
Salpingo-oophorectomy.
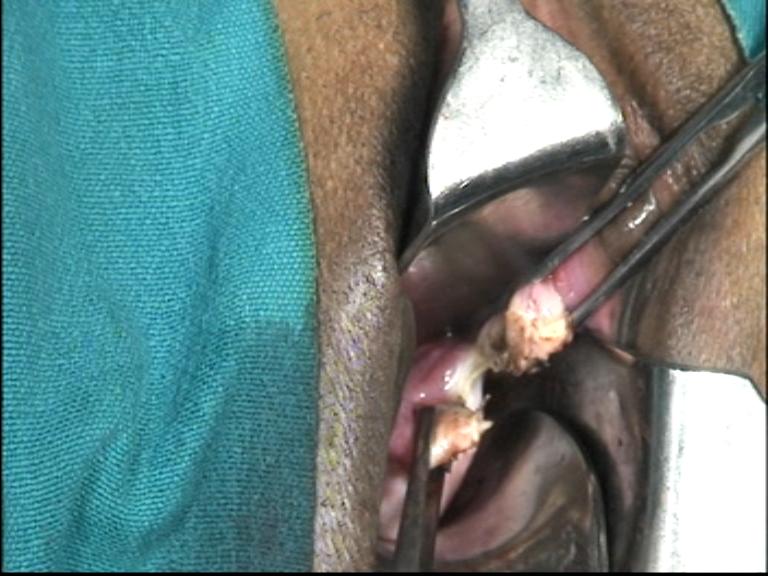
Figure - 27
The split is deepened and the round ligament stump is separated from tube with ovarian ligament. Now, round ligament stump is released. It goes to lateral pelvic wall.Do not excise the round ligament. Tiny bleeder if any is cauterized. Then the ovarian ligament with tube is pulled medially downward by Allis forceps. Apply the tip of the right angle forceps from the posterior aspect just lateral to the ovary and spread the prongs. Coagulate and incise the mesosalpinx between prongs of forceps step- by- step, and reach to a level above the upper pole of ovary. Tissues are dissected close to the ovary. The space between prongs of right angle forceps creates a safe working platform for bipolar and scissors away from lateral wall structures. This maneuver thus dissects and separates the infundibulopelvic ligament from the lateral wall vessels,ureter. It prepares for a long stump of infundibulopelvic ligament. Again apply the right angle forceps to the infundibulopelvic ligament from posterior aspect, hook it by its bend,(Figure 28) spread it between the prongs, cauterize it by bipolar current close to ovary, and then divide it by scissors.
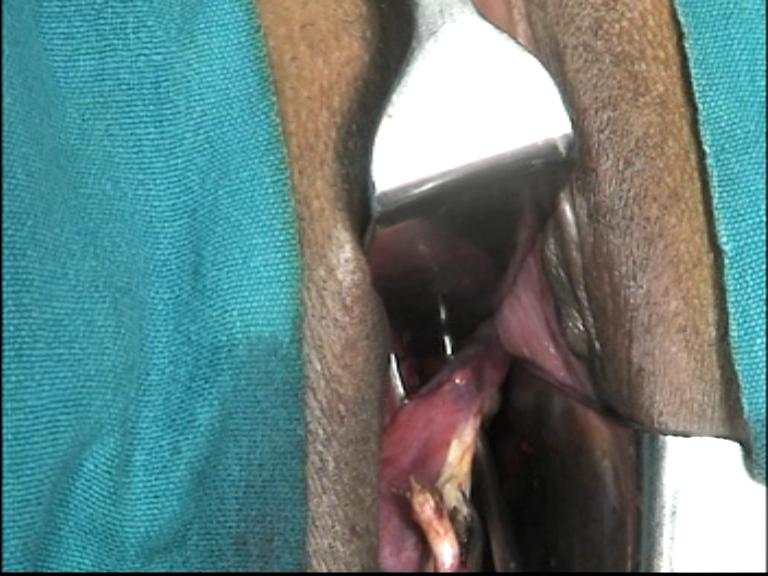
Figure - 28
Take smaller bites at a time and proceed step by step to achieve complete hemostasis during separation of the infundibulopelvic ligament. Traction on the round ligament is applied to continue visualization of the stump of infundibulopelvic ligament. The stump of the infundibulopelvic ligament is visualized and adequately cauterized to achieve complete hemostasis. Right angle forceps elevates the infundibulopelvic ligament from posterior aspect, brings target tissues to the operator’s view and away from intestine, its bend prevents bowels coming into the working space between its prongs. Its prongs prevent lateral structures coming into the working space. That is how the coagulation and incision between the prongs of right angle forceps is safe. Ovary with tube is removed. In cases with poor visibility up to the upper pole of ovary due to obesity, short infundibulopelvic ligament, cyst, and adhesion a rigid and thin torch like a pelvic illuminator or a 10mm telescope with light source is used to illuminate the pelvic structures.
CASE SELECTION
To watch the video, kindly register and note the Username and Password for future log in. You can also download the video to your computer. To learn and practice, always watch the steps of the procedure before entering the operation theater for vaginal hysterectomy at least for six months. Kindly see some interesting specimens removed during vaginal hysterectomy by Purohit technique and appreciate the scope of the technique. We request you to kindly fill up the feedback form or email your comments and suggestions on different aspects of the technique, which will be valuable for us.
-
- Ram Krishna Purohit: Purohit technique of vaginal hysterectomy:
- a new approach BJOG (British Journal of Obstetric and Gynaecology):
- an International Journal of Obstetrics and Gynaecology, 2003 Dec, Vol. 110 (12) pp. 1115-1119
- View this document:To download right click and select save link as
- Ram K. Purohit: Purohit technique of vaginal hysterectomy:
- A new approach performed in 214 patients.
- Gynaecological endoscopy 2002 Dec; 11(6); 423-430
- View this document:To download right click and select save link as
- R. K. Purohit, A. K. Pattnaik:
- Vaginal Hysterectomy by Electrosurgery (An Extraperitoneal Approach),
- J Obstet Gynecol India Vol.51, No. 5: September/October 2001 Pg 162-164
- View this document:To download right click and select save link as
- Purohit Ram Krishna, Tripathy Prakash Narayan, Pattnaik Abhaya Kumar:
- Vaginal Hysterectomy Using Electrocautery and Purohit Approach To Uterine Artery,
- J Obstet Gynecol India Vol.53, No. 5: September / October 2003 Pg 475-478
- View this document:To download right click and select save link as
- Ram Krishna Purohit, MD, Jay Gopal Sharma, MS, Sarabjeet Singh, DGO, and Dipak Kumar Giri, MD:
- Vaginal Hysterectomy by Electrosurgery for Benign Indications Associated with Previous Cesarean Section
- JOURNAL OF GYNECOLOGIC SURGERY Volume 29, Number 1, 2013, Pages: 07 - 12 © Mary Ann Liebert, Inc.DOI: 10.1089/gyn.2012.0082
- View this document:To download right click and select save link as
- Ram Krishna Purohit, MD, Jay Gopal Sharma, MS and Shikha Joshi, MD:
- Adnexectomy During Vaginal Hysterectomy for Benign Indications Using Bipolar Hemostasis of Lateral Pedicles and Transvaginal Adnexa Mobilization
- JOURNAL OF GYNECOLOGIC SURGERY Volume 31, Number 2, 2015 Pages: 86 - 91 © Mary Ann Liebert, Inc.DOI: 10.1089/gyn.2014.0088
- View this document:To download right click and select save link as
- Ram Krishna Purohit, MD, Jay Gopal Sharma,Devajani Meher,Sanjay Raosaheb Rakh and Surya Malik:
- Completion of vaginal hysterectomy by electro surgery using anteroposterior approach in benign cases faced with obliterated posterior cul-de-sac
- View this document:To download right click and select save link as
- Dr.Ramkrishna Purohit,Dr.Jay Gopal Sharma,Dr.Devajani Meher,Dr.Sanjay Raosaheb Rakh,Dr.Minal Choudhary:
- A laparovaginal strategy to avoid bladder injury during laparoscopic-assisted vaginal hysterectomy in cases with ventrofixed uterus following previous cesarean section
- International Journal of Women’s Health
- View this document:To download right click and select save link as